




Showing posts with label celine. Show all posts
Showing posts with label celine. Show all posts
Monday, June 27, 2011
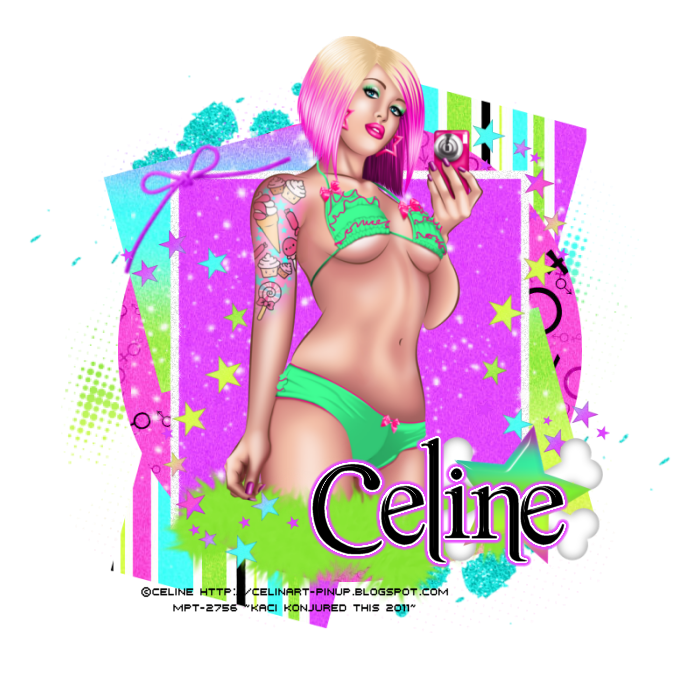
So Captivating
 1:53 PM |
  Posted by
Kaci
Posted by
Kaci

This tutorial was written by Kaci on June 27, 2011. Any resemblance to any other tutorials is purely coincidental! You may not copy/paste any part of my tuts elsewhere, but you may text link to them for challenges etc!
Supplies Needed:
Temp109 by Rosey, you can find it HERE
Tube or image of choice, I am using the fantastic artwork of Celine, you can find these tubes HERE
Scrapkit of choice, I am using a great kit by Tamie called Teacher's Pet, you can find it HERE
Let's Begin!
Open your template
Hit shift d and close the original
Delete credits and raster 2
Select pink square
Select all, float, and defloat
Paste paper12 as a new layer
Invert your selection and hit delete
Select none
Delete pink square
Repeat for pink small rectangles
Select pink circle
Select all, float, and defloat
Paste paper1 as a new layer
Invert your selection and hit delete
Select none
Delete pink circle
Select blue rectangles
Select all, float, and defloat
Paste paper2 as a new layer
Invert your selection and hit delete
Select none
Delete blue rectangles
Repeat for frame pink fill
Colorize square glitter outline fill to white
Select pink square
Select all, float, and defloat
Paste paper9 as a new layer
Invert your selection and hit delete
Select none
Delete pink square
Add noise to your wording and dotted lines
Add your tube of choice
Resize and position as desired
Add any elements you like
Resize and position
Add any dropshadows you like
Crop and resize as desired
Add your name and copyright
Resize as desired
Save!
Thanks for trying my tut!

 Labels:

Tuesday, May 3, 2011
I {heart} Kawaii

This tutorial was written by Kaci on May 2, 2011. Any resemblance to any other tutorials is purely coincidental! You may not copy/paste any part of my tuts elsewhere, but you may text link to them for challenges etc!
Supplies Needed:
Temp26 by Missy, you can find it HERE
Tube or image of choice, I am using the fantastic artwork of Celine, you can find these tubes HERE
Scrapkit of choice, I am using a great kit by Rieka called Kawaii, you can find it HERE
Let's Begin!
Open your template
Hit shift d and close the original
Delete raster 1 & background
Resize all layers to 650x635
Now go to Image Canvas Size and change to 675x675
Select circle
Select all, float, and defloat
Paste paper20 as a new layer
Invert your selection and hit delete
Select none
Delete circle
Select small stars
Select all, float, and defloat
Paste paper2 as a new layer
Invert your selection and hit delete
Select none
Delete small stars
Select star
Select all, float, and defloat
Paste paper3 as a new layer
Invert your selection and hit delete
Select none
Delete star
Now add a new raster layer and send to the bottom
On this layer select all
Paste paper7 into your selection
Apply mask of choice
Merge group
Add your tube of choice
Resize and position as desired
Add any elements you like
Resize and position
Add any dropshadows you like
Crop and resize as desired
Add your name and copyright
Resize as desired
Save!
Thanks for trying my tut!
Thursday, April 28, 2011
Middle Finger

This tutorial was written by Kaci on April 28, 2011. Any resemblance to any other tutorials is purely coincidental! You may not copy/paste any part of my tuts elsewhere, but you may text link to them for challenges etc!
Supplies Needed:
LindaDebTemp1 by Linda n Deb, you can find it HERE
Tube or image of choice, I am using the fantastic artwork of Celine, you can find these tubes HERE
Scrapkit of choice, I am using a great kit by Toxic Desirez called Punk Star 4, you can find it HERE
Let's Begin!
Open your template
Hit shift d and close the original
Delete raster 11 & 1 & 4
Select raster 3
Select all, float, and defloat
Paste paper26 as a new layer
Invert your selection and hit delete
Select none
Delete raster 3
Select raster 2
Select all, float, and defloat
Paste paper4 as a new layer
Invert your selection and hit delete
Select none
Delete raster 2
Select raster 6
Select all, float, and defloat
Paste paper2 as a new layer
Invert your selection and hit delete
Select none
Delete raster 6
Add noise of choice to rasters 5, 10, copy of 10, and copy of vector 1
Add your tube of choice
Resize and position as desired
Add any elements you like
Resize and position
Add any dropshadows you like
Crop and resize as desired
Add your name and copyright
Resize as desired
Save!
Thanks for trying my tut!
Friday, April 8, 2011
Rock Princess

This tutorial was written by Kaci on April 8, 2011. Any resemblance to any other tutorials is purely coincidental! You may not copy/paste any part of my tuts elsewhere, but you may text link to them for challenges etc!
Supplies Needed:
CM Collab Temp3 by Tonya n Deb, you can find it HERE
Tube or image of choice, I am using the fantastic artwork of Celine, you can find them HERE
Scrapkit of choice, I am using a great kit by Kristin called Punk Star 2, you can find it HERE
Let's Begin!
Open your template
Hit shift d and close the original
Delete credits and background
Colorize rock princess and rectangle to match
Select raster 1
Select all, float, and defloat
Paste paper21 as a new layer
Invert your selection and hit delete
Select none
Delete raster 1
Repeat for copy of raster 1
Select left shape
Select all, float, and defloat
Paste paper26 as a new layer
Invert your selection and hit delete
Select none
Delete left shape
Repeat for right shape
Select oval
Select all, float, and defloat
Paste paper23 as a new layer
Invert your selection and hit delete
Select none
Delete oval
Add noise of choice to your frames and arrows
Add your tube of choice
Resize and position as desired
Add any elements you like
Resize and position
Add any dropshadows you like
Crop and resize as desired
Add your name and copyright
Resize as desired
Save!
Thanks for trying my tut!
Saturday, April 2, 2011
Naughty Angel

This tutorial was written by Kaci on April 2, 2011. Any resemblance to any other tutorials is purely coincidental! You may not copy/paste any part of my tuts elsewhere, but you may text link to them for challenges etc!
Supplies Needed:
Tube or image of choice, I am using one by Celine, which you can purchase her tubes HERE
Font of choice
Plugin used DSB Flux Linear Transmission
Let's Begin!
Open a new image 700x700
Paste your tube of choice as a new layer
Resize as needed
Ok, now duplicate your tube
On the bottom layer apply a gaussian blur of 25 or so
Go to effects-texture-mosaic antique and use these settings

Duplicate your top tube layer again
On your middle tube layer give a gaussian blur of 15 or so
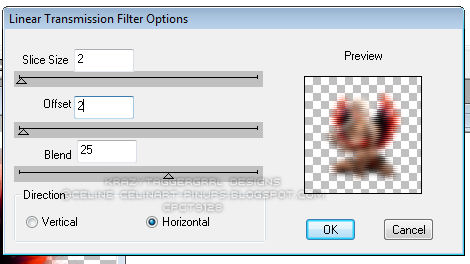
Apply plug in dsb flux linear transmission
Use these settings:
Ok, one more time duplicate your top tube
Give the top layer a gaussian blur of 2 no more
Change the blend mode on this layer to hard light
Lower the opacity to 70 or so
Add any embellishments you like
Add your name and any copyright info you need
Save as png!
Friday, April 1, 2011
Cheeky Blue Bunny

This tutorial was written by Kaci on April 1, 2011. Any resemblance to any other tutorials is purely coincidental! You may not copy/paste any part of my tuts elsewhere, but you may text link to them for challenges etc!
Supplies Needed:
Temp35 by Missy, you can find it HERE
Tube or image of choice, I am using the fantastic artwork of Celine, you can find them HERE
Scrapkit of choice, I am using a great kit by Tamie called Cheeky Bunny Blue, you can find it HERE
Let's Begin!
Open your template
Hit shift d and close the original
Delete info layer, square, and background layer
Resize all layers to 650x653
Go to image, canvas size and change to 700x675
Select bracket bg
Select all, float, and defloat
Paste paper4 as a new layer
Invert your selection and hit delete
Select none
Delete bracket bg
Select bracket3
Select all, float, and defloat
Paste paper5 as a new layer
Invert your selection and hit delete
Select none
Delete bracket3
Select bracket2
Select all, float, and defloat
Paste paper11 as a new layer
Invert your selection and hit delete
Select none
Delete bracket2
Select bracket1
Select all, float, and defloat
Paste paper2 as a new layer
Invert your selection and hit delete
Select none
Delete bracket1
Add your tube of choice
Resize and position as desired
Add any elements you like
Resize and position
Add any dropshadows you like
Crop and resize as desired
Add your name and copyright
Resize as desired
Save!
Thanks for trying my tut!
Wednesday, March 23, 2011
Sexy Me
This tutorial was written by Kaci on March 23, 2011. Any resemblance to any other tutorials is purely coincidental! You may not copy/paste any part of my tuts elsewhere, but you may text link to them for challenges etc!
Supplies Needed:
BeautifulTemp by Bru, you can find it HERE
Tube or image of choice, I am using the fantastic artwork of Celine, you can find her work HERE
Scrapkit of choice, I am using a great kit by me called Celine's Sexy Phone, you can find it HERE
Let's Begin!
Open your template
Hit shift d and close the original
Delete raster 1, all wording, and background
Select bottom top square
Select all, float, and defloat
Paste paper14 as a new layer
Invert your selection and hit delete
Select none
Delete bottom top square
Repeat for bottom square
Select gray circle
Select all, float, and defloat
Paste paper9 as a new layer
Invert your selection and hit delete
Select none
Delete gray circle
Select top left square
Select all, float, and defloat
Paste paper20 as a new layer
Invert your selection and hit delete
Select none
Delete top left square
Repeat for bottom right square
Select middle dark gray square
Select all, float, and defloat
Paste paper15 as a new layer
Invert your selection and hit delete
Select none
Delete middle dark gray square
Add the halftone and send to the bottom
Resize it by 165%
Add your tube of choice
Resize and position as desired
Add any elements you like
Resize and position
Add any dropshadows you like
Crop and resize as desired
Add your name and copyright
Resize as desired
Save!
Thanks for trying my tut!
Sunday, March 13, 2011
She Likes To Rock

This tutorial was written by Kaci on March 13, 2011. Any resemblance to any other tutorials is purely coincidental! You may not copy/paste any part of my tuts elsewhere, but you may text link to them for challenges etc!
Supplies Needed:
Beautiful Temp by Brunette, you can find it HERE
Tube or image of choice, I am using the fantastic artwork of Celine Bonnet, you can find them HERE
Scrapkit of choice, I am using a great kit by Tamie called Guitar Star 2, you can find it HERE
Let's Begin!
Open your template
Hit shift d and close the original
Delete raster 1, all wording and background
Select bottom top square
Select all, float, and defloat
Paste paper11 as a new layer
Invert your selection and hit delete
Select none
Delete bottom top square
Repeat for bottom square
Select gray circle
Select all, float, and defloat
Paste paper9 as a new layer
Invert your selection and hit delete
Select none
Delete gray circle
Select top left square
Select all, float, and defloat
Paste paper5 as a new layer
Invert your selection and hit delete
Select none
Delete top left square
Repeat for bottom right square
Select middle dark gray square
Select all, float, and defloat
Paste paper3 as a new layer
Invert your selection and hit delete
Select none
Delete middle dark gray square
Add your tube of choice
Resize and position as desired
Add any elements you like
Resize and position
Add any dropshadows you like
Crop and resize as desired
Add your name and copyright
Resize as desired
Save!
Thanks for trying my tut!
Saturday, March 12, 2011
Try To Be A Lady

This tutorial was written by Kaci on March 12, 2011. Any resemblance to any other tutorials is purely coincidental! You may not copy/paste any part of my tuts elsewhere, but you may text link to them for challenges etc!
Supplies Needed:
Temp81 by Deb, you can find it HERE
Tube or image of choice, I am using the fantastic artwork of Celine Bonnet, you can find them HERE
Scrapkit of choice, I am using a great kit by Kristin called Cute Lil Devil, you can find it HERE
Let's Begin!
Open your template
Hit shift d and close the original
Delete raster 7
Select black rectangle
Select all, float, and defloat
Paste paper11 as a new layer
Invert your selection and hit delete
Select none
Delete black rectangle
Select grey rectangle
Select all, float, and defloat
Paste paper2 as a new layer
Invert your selection and hit delete
Delete grey rectangle
Paste your close up tube of choice above this layer
Invert your selection twice
Hit delete on your tube layer to get rid of the overhanging bits
Select none
Change the blend mode to hard light and drop the opacity to 70 or to your liking
Select pink rectangle
Select all, float, and defloat
Paste paper21 as a new layer
Invert your selection and hit delete
Select none
Delete pink rectangle
Select lt pink rectangle
Select all, float, and defloat
Paste paper5 as a new layer
Invert your selection and hit delete
Select none
Delete lt pink rectangle
Repeat the steps above for your lt pink rect layer
Change the blend mode here to soft light
Add noise of choice to your wording backgrounds
Add your tube of choice
Resize and position as desired
Add any elements you like
Resize and position
Add any dropshadows you like
Crop and resize as desired
Add your name and copyright
Resize as desired
Save!
Thanks for trying my tut!
Subscribe to:
Posts (Atom)