


Monday, October 22, 2012
Autumn's Kiss

This tutorial was written by Kaci on October 22, 2012. Any resemblance to any other tutorials is purely coincidental! You may not copy/paste any part of my tuts elsewhere, but you may text link to them for challenges etc!
Supplies Needed:
Temp 179 by Kristin, you can find it HERE
Tube or image of choice, I am using a tube by Pinup Toons and you must have permission to use them, you can find out more HERE
Scrapkit of choice, I am using a great kit by Tasha's Playground called Autumn's Kiss, which you can find it HERE
Let's Begin!
Open your template
Hit shift d and close the original
Delete credits, face, bats, and background
Go to Image, Canvas Size, and change to 700x700 centered
Select top black square
Select all, float, and defloat
Paste paper3 as a new layer
Invert your selection and hit delete
Select non
Delete top black square
Repeat for bottom black square
Select rectangle
Select all, float, and defloat
Paste paper1 as a new layer
Invert your selection and hit delete
Select non
Delete rectanle
Select top red circle
Select all, float, and defloat
Paste paper4 as a new layer
Invert your selection and hit delete
Select non
Delete top red circle
Repeat for bottom red circle
Select top round rectangle
Select all, float, and defloat
Paste paper2 as a new layer
Invert your selection and hit delete
Select non
Delete top round rectangle
Repeat for bottom round rectangle
Select circle
Select all, float, and defloat
Paste paper7 as a new layer
Invert your selection and hit delete
Select non
Delete circle
Add your tube of choice
Resize as desired
Add any elements you like
Resize and position
Add any dropshadows you like
Crop and resize as desired
Add your name and copyright
Resize as desired
Save!
Thanks for trying my tut!

Bewitched
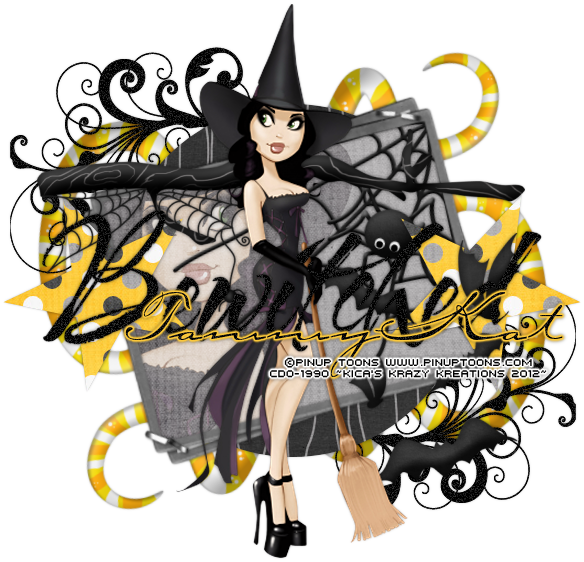
This tutorial was written by Kaci on October 22, 2012. Any resemblance to any other tutorials is purely coincidental! You may not copy/paste any part of my tuts elsewhere, but you may text link to them for challenges etc!
Supplies Needed:
Temp 95 by Kristin, you can find it HERE
Tube or image of choice, I am using a tube by Pinup Toons and you must have permission to use them, you can find out more HERE
Scrapkit of choice, I am using a great kit by TammyKat called October Bonus Freebie Inspired by Concetta Kilmer, which you can find it HERE and it's FREE!!! Scroll to the bottom of the post for the download link :)
Let's Begin!
Open your template
Hit shift d and close the original
Delete credits, face, bats, and background
Go to Image, Canvas Size, and change to 700x700 centered
Apply noise of choice to your doodles and wordart
Select circle
Select all, float, and defloat
Paste paper1 as a new layer
Invert your selection and hit delete
Select non
Delete circle
Select stars
Select all, float, and defloat
Paste paper2 as a new layer
Invert your selection and hit delete
Select non
Delete stars
Add your tube of choice
Resize as desired
Add any elements you like
Resize and position
Add any dropshadows you like
Crop and resize as desired
Add your name and copyright
Resize as desired
Save!
Thanks for trying my tut!
Pirate's Trick or Treat

This tutorial was written by Kaci on October 22, 2012. Any resemblance to any other tutorials is purely coincidental! You may not copy/paste any part of my tuts elsewhere, but you may text link to them for challenges etc!
Supplies Needed:
Temp 90 by Kristin, you can find it HERE
Tube or image of choice, I am using a tube by Ismael Rac and you must have permission to use them, you can find out more HERE
Scrapkit of choice, I am using a great kit by TammyKat called Pirate Punk, which you can find it HERE and it's FREE!!!
Mask of choice
Let's Begin!
Open your template
Hit shift d and close the original
Delete credits, pumpkin, and background
Resize all layers to 700 pixels on longest side
Go to Image, Canvas Size, and change to 725x650 centered
Add a new layer and send to the bottom
Select all and paste solidpaper1 into your selection
Select none
Apply mask of choice
Merge group
Apply noise of choice to your doodle layer
Select rectangle
Select all, float, and defloat
Paste blkpaper2 as a new layer
Invert your selection and hit delete
Delete rectangle
Invert your selection again
Paste solidpaper2 above your rectangle layer
Expand your selection by 3
Invert and hit delete
Invert again
Contract your selection by 10
Hit delete
Select none
Add noise of choice again to your wordart
Add your tube of choice
Resize as desired
Add any elements you like
Resize and position
Add any dropshadows you like
Crop and resize as desired
Add your name and copyright
Resize as desired
Save!
Thanks for trying my tut!
Thursday, October 11, 2012
Keep Track Of Your Rack

This tutorial was written by Kaci on October 11, 2012. Any resemblance to any other tutorials is purely coincidental! You may not copy/paste any part of my tuts elsewhere, but you may text link to them for challenges etc!
Supplies Needed:
Keep Track Temp by Tonya, you can find it HERE
Tube or image of choice, I am using a tube by Robin McQuay and you must have permission to use them, you can find out more HERE
Scrapkit of choice, I am using a great kit by Tashas Playground called Check Your ChiChis, which you can find it HERE and it's FREE!!!
Let's Begin!
Open your template
Hit shift d and close the original
Delete credits, bca ribbon, dotted circle, and background
Resize all layers to 700 pixels on longest side
Go to Image, Canvas Size, and change to 715x700 centered
Select weirdo shape 1
Select all, float, and defloat
Paste paper5 as a new layer
Invert your selection and hit delete
Select none
Delete weirdo shape 1
Repeat for weirdo shape 2
Select rectangle1
Select all, float, and defloat
Paste paper6 as a new layer
Invert your selection and hit delete
Select none
Delete rectangle1
Repeat for rectangle2
Select circle
Select all, float, and defloat
Paste paper8 as a new layer
Invert your selection and hit delete
Select none
Delete circle
Colorize circle background to your liking
Select wordart
Select all, float, and defloat
Paste paper5 as a new layer
Invert your selection and hit delete
Select none
Delete wordart
Select heart1
Select all, float, and defloat
Paste paper2 as a new layer
Invert your selection and hit delete
Select none
Delete heart1
Repeat for heart2
Add your tube of choice
Resize as desired
Add any elements you like
Resize and position
Add any dropshadows you like
Crop and resize as desired
Add your name and copyright
Resize as desired
Save!
Thanks for trying my tut!
Tuesday, October 9, 2012
Practice Safe Hex

This tutorial was written by Kaci on October 9, 2012. Any resemblance to any other tutorials is purely coincidental! You may not copy/paste any part of my tuts elsewhere, but you may text link to them for challenges etc!
Supplies Needed:
Template 161 by Leah, you can find it HERE
Supplies Needed:
Template 161 by Leah, you can find it HERE
Tube or image of choice, I am using a tube by Amy Matthews and you must have permission to use them, you can find out more HERE
Scrapkit of choice, I am using a great kit by Designs By Sarah called Boo 2 U Mix n Match Mega, which you can find it HERE
Plugins: Penta Color Dot
Let's Begin!
Open your template
Hit shift d and close the original
Delete credits and background
Resize all layers to 675 pixels on longest side
Go to Image, Canvas Size, and change to 715x550 centered
On layers 11 & 12 apply penta color dot, change the distance to 10
Repeat for layer 2
Select 10
Select all, float, and defloat
Paste paper4 as a new layer
Invert your selection and hit delete
Select none
Delete 10
Repeat for 6, 4, and words 1 back
Select 9
Select all, float, and defloat
Paste paper2 as a new layer
Invert your selection and hit delete
Select none
Delete 9
Repeat for 8 & 3
Select 7
Select all, float, and defloat
Paste paper8 as a new layer
Invert your selection and hit delete
Select none
Delete 7
Select 5
Select all, float, and defloat
Paste paper1 as a new layer
Invert your selection and hit delete
Select none
Delete 5
Select 1
Select all, float, and defloat
Paste paper2 as a new layer
Invert your selection and hit delete
Select none
Delete 1
Select words 2
Select all, float, and defloat
Paste paper6 as a new layer
Invert your selection and hit delete
Select none
Delete words 2
Add your tube of choice
Resize as desired
Add any elements you like
Resize and position
Add any dropshadows you like
Crop and resize as desired
Add your name and copyright
Resize as desired
Save!
Thanks for trying my tut!
Sunday, October 7, 2012
Bliss To Me

This tutorial was written by Kaci on October 7, 2012. Any resemblance to any other tutorials is purely coincidental! You may not copy/paste any part of my tuts elsewhere, but you may text link to them for challenges etc!
Supplies Needed:
Template 144 by Leah, you can find it HERE
Tube or image of choice, I am using a tube by Alex Prihodko and you must have permission to use them, you can find out more HERE
Scrapkit of choice, I am using a great kit by Sarah's Tags n Things called Bliss To me, which you can find it HERE
Let's Begin!
Open your template
Hit shift d and close the original
Delete credits and background
Select 7
Select all, float, and defloat
Paste paper6 as a new layer
Invert your selection and hit delete
Select none
Delete 7
Repeat for 4
Select 6
Select all, float, and defloat
Paste paper5 as a new layer
Invert your selection and hit delete
Select none
Delete 6
Repeat for 3
Select 5
Select all, float, and defloat
Paste paper1 as a new layer
Invert your selection and hit delete
Select none
Delete 5
Select 2
Select all, float, and defloat
Paste paper8 as a new layer
Invert your selection and hit delete
Select none
Delete 2
Select 1
Select all, float, and defloat
Paste paper3 as a new layer
Invert your selection and hit delete
Select none
Delete 1
Add your tube of choice
Resize as desired
Add any elements you like
Resize and position
Add any dropshadows you like
Crop and resize as desired
Add your name and copyright
Resize as desired
Save!
Thanks for trying my tut!
Golden Autumn

This tutorial was written by Kaci on October 7, 2012. Any resemblance to any other tutorials is purely coincidental! You may not copy/paste any part of my tuts elsewhere, but you may text link to them for challenges etc!
Supplies Needed:
Template 47 by Millie, you can find it HERE
Tube or image of choice, I am using a tube by Alex Prihodko and you must have permission to use them, you can find out more HERE
Scrapkit of choice, I am using a great kit by Designs By Sarah called Fall Fancy, which you can find it HERE
Let's Begin!
Open your template
Hit shift d and close the original
Delete cr, 11, 10, and background
Select 1
Select all, float, and defloat
Paste paper7 as a new layer
Invert your selection and hit delete
Select none
Delete 1
Repeat for 3 & 9
Select 2
Select all, float, and defloat
Paste paper6 as a new layer
Invert your selection and hit delete
Select none
Delete 2
Select 4
Select all, float, and defloat
Paste paper8 as a new layer
Invert your selection and hit delete
Select none
Delete 4
Repeat for 5
Select 6
Select all, float, and defloat
Paste paper4 as a new layer
Invert your selection and hit delete
Select none
Delete 6
Select 7
Select all, float, and defloat
Paste paper9 as a new layer
Invert your selection and hit delete
Select none
Delete 7
Select 8
Select all, float, and defloat
Paste paper10 as a new layer
Invert your selection and hit delete
Select none
Delete 8
Add your tube of choice
Resize as desired
Add any elements you like
Resize and position
Add any dropshadows you like
Crop and resize as desired
Add your name and copyright
Resize as desired
Save!
Thanks for trying my tut!
Saturday, October 6, 2012
Be Aware

This tutorial was written by Kaci on October 6, 2012. Any resemblance to any other tutorials is purely coincidental! You may not copy/paste any part of my tuts elsewhere, but you may text link to them for challenges etc!
Supplies Needed:
BCA Be Aware Temp by Tonya, you can find it HERE misfits blog
Tube or image of choice, I am using a tube by myself Kaci McVay and you must have permission to use them, you can find out more HERE
Scrapkit of choice, I am using a great kit by Inzpired Creationz called Save The Tatas, which you can find it HERE for FREE!!!
Let's Begin!
Open your template
Hit shift d and close the original
Delete credits, hearts, and background
Select rectangle1
Select all, float, and defloat
Paste paper10 as a new layer
Invert your selection and hit delete
Select none
Delete rectangle1
Repeat for rectangle2
Select circle1
Select all, float, and defloat
Paste paper2 as a new layer
Invert your selection and hit delete
Select none
Delete circle1
Select circle2
Select all, float, and defloat
Paste paper3 as a new layer
Invert your selection and hit delete
Select none
Delete circle2
Add noise of choice to rectangle background, both bca ribbons, and wordart background
Colorize your wordart and top rectangle to your liking
Add your tube of choice
Resize as desired
Add any elements you like
Resize and position
Add any dropshadows you like
Crop and resize as desired
Add your name and copyright
Resize as desired
Save!
Thanks for trying my tut!
Subscribe to:
Posts (Atom)