


Saturday, February 26, 2011
Sweet Taste Of Poison
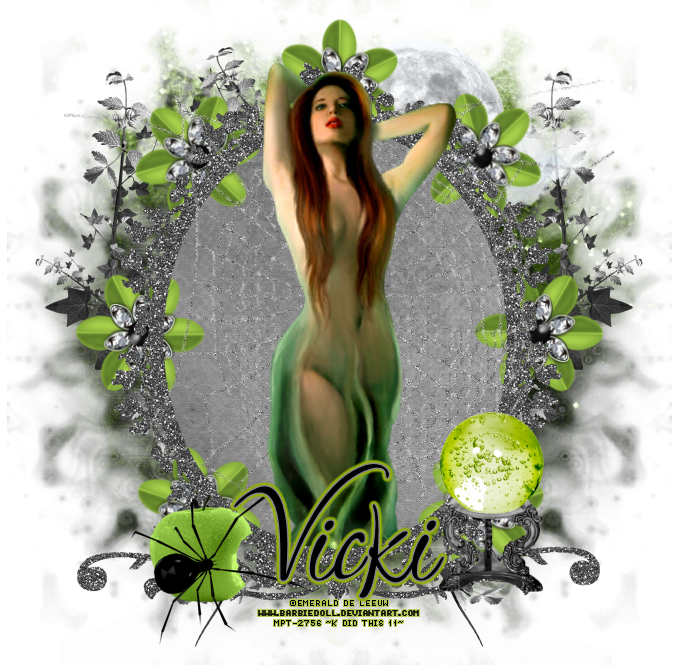
This tutorial was written by Kaci on February 26, 2011. Any resemblance to any other tutorials is purely coincidental! You may not copy/paste any part of my tuts elsewhere, but you may text link to them for challenges etc!
Supplies Needed:
Tube or image of choice, I am using the fantastic artwork of Emerald de Leeuw, you can find them HERE
Scrapkit of choice, I am using a great kit by Vicki called Taste Of Venom, you can find it HERE
Mask of choice
Let's Begin!
Open a new image 700x700
Select all and paste paper2 into your selection
Select none
Apply mask of choice
Merge group
Paste ele37 as a new layer
Take your magic wand
Tolerance at 20 and feather at 0
Select the inside of your frame
Go to Selections-Modify-Expand by 5
Paste paper3 below your frame
Invert your selecton on the paper layer
Hit delete and select none
Add your tube of choice
Resize by 150%
Duplicate, one layer above your frame, one below
Erase the bits so it looks like she's coming out of your frame appropriately
Add any elements you like
Resize and position
Add any dropshadows you like
Crop and resize as desired
Add your name and copyright
Resize as desired
Save!
Thanks for trying my tut!

Turn My Swag On

This tutorial was written by Kaci on February 26, 2011. Any resemblance to any other tutorials is purely coincidental! You may not copy/paste any part of my tuts elsewhere, but you may text link to them for challenges etc!
Supplies Needed:
DBV_TurnMySwagOn by Vaybs, you can find it HERE
Tube or image of choice, I am using the fantastic artwork of Ismael Rac, you can find them HERE
Scrapkit of choice, I am using a great kit by Vicki called Candy Punkd, you can find it HERE
Let's Begin!
Open your template
Hit shift d and close the original
Delete cr and raster 1
Go to Image, Canvas Size and change to 700x700
Colorize your crown n wordart layers to match
Add a new raster layer
Select rec1
Select all, float, and defloat
Paste paper16 as a new layer
Invert your selection and hit delete
Select none
Delete rec1
Repeat for circ4
Select rec2
Select all, float, and defloat
Paste paper7 as a new layer
Invert your selection and hit delete
Select none
Delete rec2
Select circ1
Select all, float, and defloat
Paste paper1 as a new layer
Invert your selection and hit delete
Select none
Delete circ1
Select circ2
Select all, float, and defloat
Paste paper13 as a new layer
Invert your selection and hit delete
Select none
Delete circ2
Repeat for circ3
Select rec3
Select all, float, and defloat
Paste paper6 as a new layer
Invert your selection and hit delete
Select none
Delete rec3
Select circ5
Select all, float, and defloat
Paste paper4 as a new layer
Invert your selection and hit delete
Select none
Delete circ5
Add your tube of choice
Resize and position as desired
Add any elements you like
Resize and position
Add any dropshadows you like
Crop and resize as desired
Add your name and copyright
Resize as desired
Save!
Thanks for trying my tut!
Blue Easter

This tutorial was written by Kaci on February 26, 2011. Any resemblance to any other tutorials is purely coincidental! You may not copy/paste any part of my tuts elsewhere, but you may text link to them for challenges etc!
Supplies Needed:
Temp3 by Deb, you can find it HERE
Tube or image of choice, I am using the fantastic artwork of Joel Adams, you can find them HERE
Scrapkit of choice, I am using a great kit by Vicki called Bunny Love Blue, you can find it HERE
Mask Of Choice
Let's Begin!
Open your template
Hit shift d and close the original
Delete raster 1 and background
Go to Image, Canvas Size and change to 650x650
Add a new raster layer
Select all and paste paper2 into your selection
Select none
Apply mask of choice
Merge group
Resize and position as ya like
Select raster 2
Select all, float, and defloat
Paste paper6 as a new layer
Invert your selection and hit delete
Select none
Delete raster 2
Select rectangles
Select all, float, and defloat
Paste paper8 as a new layer
Invert your selection and hit delete
Select none
Delete rectangles
Select frames
Select all, float, and defloat
Paste paper7 as a new layer
Invert your selection and hit delete
Select none
Delete frames
Add your tube of choice
Resize and position as desired
Add any elements you like
Resize and position
Add any dropshadows you like
Crop and resize as desired
Add your name and copyright
Resize as desired
Save!
Thanks for trying my tut!
Friday, February 25, 2011
Sweet Bunny Love

This tutorial was written by Kaci on February 25, 2011. Any resemblance to any other tutorials is purely coincidental! You may not copy/paste any part of my tuts elsewhere, but you may text link to them for challenges etc!
Supplies Needed:
Temp73 by Melissa, you can find it HERE
Tube or image of choice, I am using the fantastic artwork of Keith Garvey, you can find them HERE
Scrapkit of choice, I am using a great kit by Vicki called Bunny Love Pink, you can find it HERE
Let's Begin!
Open your template
Hit shift d and close the original
Delete raster 7
Go to Image, Canvas Size and change to 650x650
Colorize raster 4 & copy of raster 4 to your liking
Select raster 5
Select all, float, and defloat
Paste paper6 as a new layer
Invert your selection and hit delete
Select none
Delete raster 5
Select raster 2
Select all, float, and defloat
Paste paper8 as a new layer
Invert your selection and hit delete
Select none
Delete raster 2
Select raster 3
Select all, float, and defloat
Paste paper10 as a new layer
Invert your selection and hit delete
Select none
Delete raster 3
Select raster 6
Select all, float, and defloat
Paste paper11 as a new layer
Invert your selection and hit delete
Select none
Delete raster 6
Repeat for copy of raster 6
Select raster 1
Select all, float, and defloat
Paste paper4 as a new layer
Invert your selection and hit delete
Select none
Delete raster 1
Repeat for copy of raster 1
Add your tube of choice
Resize and position as desired
Add any elements you like
Resize and position
Add any dropshadows you like
Crop and resize as desired
Add your name and copyright
Resize as desired
Save!
Thanks for trying my tut!
Temptingly Tainted

This tutorial was written by Kaci on February 25, 2011. Any resemblance to any other tutorials is purely coincidental! You may not copy/paste any part of my tuts elsewhere, but you may text link to them for challenges etc!
Supplies Needed:
Temp69 by Melissa, you can find it HERE
Tube or image of choice, I am using the fantastic artwork of Barbara Jensen, you can find them HERE
Scrapkit of choice, I am using a great kit by Tamie called Midnight Poison, you can find it HERE
Let's Begin!
Open your template
Hit shift d and close the original
Delete raster 10 and top merged layer
Go to Image, Canvas Size and change to 650x650
Colorize your dotted lines to match
Select raster 8
Select all, float, and defloat
Paste paper1 as a new layer
Invert your selection and hit delete
Select none
Delete raster 8
Select raster 3
Select all, float, and defloat
Paste paper12 as a new layer
Invert your selection and hit delete
Select none
Delete raster 3
Select raster 2
Select all, float, and defloat
Paste paper8 as a new layer
Invert your selection and hit delete
Select none
Delete raster 2
Select raster 4
Select all, float, and defloat
Paste paper10 as a new layer
Invert your selection and hit delete
Select none
Delete raster 4
Select middle merged
Select all, float, and defloat
Paste paper9 as a new layer
Invert your selection and hit delete
Select none
Delete middle merged
Select raster 6
Select all, float, and defloat
Paste paper4 as a new layer
Invert your selection and hit delete
Select none
Delete raster 6
Select raster 5
Select all, float, and defloat
Paste paper7 as a new layer
Invert your selection and hit delete
Select none
Delete raster 5
Add your tube of choice
Resize and position as desired
Add any elements you like
Resize and position
Add any dropshadows you like
Crop and resize as desired
Add your name and copyright
Resize as desired
Save!
Thanks for trying my tut!
So Gothique

This tutorial was written by Kaci on February 25, 2011. Any resemblance to any other tutorials is purely coincidental! You may not copy/paste any part of my tuts elsewhere, but you may text link to them for challenges etc!
Supplies Needed:
Temp17 by Melissa, you can find it HERE
Tube or image of choice, I am using the fantastic artwork of Elias Chatzoudis, you can find them HERE
Scrapkit of choice, I am using a great kit by Tamie called Gothique, you can find it HERE
Eye Candy Gradient Glow
Let's Begin!
Open your template
Hit shift d and close the original
Delete raster 1
Go to Image, Canvas Size and change to 650x650
Colorize your doodles and dotted circle to match
Select lg circle
Select all, float, and defloat
Paste paper11 as a new layer
Invert your selection and hit delete
Select none
Delete lg circle
Select circle1
Select all, float, and defloat
Paste paper8 as a new layer
Invert your selection and hit delete
Select none
Delete circle1
Select circle2
Select all, float, and defloat
Paste paper3 as a new layer
Invert your selection and hit delete
Select none
Delete circle2
Repeat for circles 3 and 7
Select circle4
Select all, float, and defloat
Paste paper6 as a new layer
Invert your selection and hit delete
Select none
Delete circle4
Repeat for circles 5 & 6
Give your doodles a gradient glow if desired
Add your tube of choice
Resize and position as desired
Add any elements you like
Resize and position
Add any dropshadows you like
Crop and resize as desired
Add your name and copyright
Resize as desired
Save!
Thanks for trying my tut!
Erin Go Bragh

This tutorial was written by Kaci on February 25, 2011. Any resemblance to any other tutorials is purely coincidental! You may not copy/paste any part of my tuts elsewhere, but you may text link to them for challenges etc!
Supplies Needed:
Temp84 by Melissa, you can find it HERE
Scrapkit of choice, I am using a great kit by Stina called Wish Me Luck, you can find it HERE
Let's Begin!
Open your template
Hit shift d and close the original
Delete raster 10
Select raster 9
Select all, float, and defloat
Paste paper13 as a new layer
Invert your selection and hit delete
Select none
Delete raster 9
Select raster 8
Select all, float, and defloat
Paste paper15 as a new layer
Invert your selection and hit delete
Select none
Delete raster 8
Select raster 5
Select all, float, and defloat
Paste paper1 as a new layer
Invert your selection and hit delete
Select none
Delete raster 5
Select raster 7
Select all, float, and defloat
Paste paper2 as a new layer
Invert your selection and hit delete
Select none
Delete raster 7
Repeat for copy of raster 7
Select raster 6
Select all, float, and defloat
Paste paper5 as a new layer
Invert your selection and hit delete
Select none
Delete raster 6
Repeat for copy of raster 6
Select raster 2
Select all, float, and defloat
Paste paper4 as a new layer
Invert your selection and hit delete
Select none
Delete raster 2
Repeat for raster 3
Add your tube of choice
Resize and position as desired
Add any elements you like
Resize and position
Add any dropshadows you like
Crop and resize as desired
Add your name and copyright
Resize as desired
Save!
Thanks for trying my tut!
Monday, February 21, 2011
Sweet Chocoholic

This tutorial was written by Kaci on February 21, 2011. Any resemblance to any other tutorials is purely coincidental! You may not copy/paste any part of my tuts elsewhere, but you may text link to them for challenges etc!
Supplies Needed:
Temp81 by Deb, you can find it HERE
Tube or image of choice, I am using the fantastic artwork of Elias Chatzoudis, you can find them HERE
Scrapkit of choice, I am using a great kit by Nikki called Dip Me In Chocolate, you can find it HERE
Let's Begin!
Open your template
Hit shift d and close the original
Delete raster 7 and all wording layers
Go to Image, Canvas Size and change to 740x650
Select black rectangle
Select all, float, and defloat
Paste paper9 as a new layer
Invert your selection and hit delete
Select none
Delete black rectangle
Select grey rectangle
Select all, float, and defloat
Paste paper2 as a new layer
Invert your selection and hit delete
Select none
Delete grey rectangle
Select pink rectangle
Select all, float, and defloat
Paste paper4 as a new layer
Invert your selection and hit delete
Select none
Delete pink rectangle
Select lt pink rectangle
Select all, float, and defloat
Paste paper11 as a new layer
Invert your selection and hit delete
Select none
Delete lt pink rectangle
Add your tube of choice
Resize and position as desired
Add any elements you like
Resize and position
Add any dropshadows you like
Crop and resize as desired
Add your name and copyright
Resize as desired
Save!
Thanks for trying my tut!
Tainted Emo

This tutorial was written by Kaci on February 21, 2011. Any resemblance to any other tutorials is purely coincidental! You may not copy/paste any part of my tuts elsewhere, but you may text link to them for challenges etc!
Supplies Needed:
Tube or image of choice, I am using the fantastic artwork of Pinup Toons, you can find them HERE
Scrapkit of choice, I am using a great kit by Vicki called Tainted Princess, you can find it HERE
Mask of choice
Let's Begin!
Open a new image 700x650
You can resize later if you like
Open ele16 and paste as a new layer
Rotate left 90 degrees and resize by 55%
Position to the left of your tag
Duplicate layer and mirror
Reposition your frames as you like
Merge frames together
On your raster 1 select all and paste paper 2 into your selection
Take your magic wand and select inside your frames
Expand your selection by 2 or as you like
On raster 1, invert your selection and hit delete
Select none
Paste paper12 as a new layer and send to the bottom
Apply mask of choice
Merge group
Add any elements you like
Resize and position as you like
Add your tube of choice
Don't forget your name and copyrights :)
Save!
Thanks for trying my tut
Sunday, February 20, 2011
Dark Impressions

This tutorial was written by Kaci on February 20, 2011. Any resemblance to any other tutorials is purely coincidental! You may not copy/paste any part of my tuts elsewhere, but you may text link to them for challenges etc!
Supplies Needed:
Temp394 by Missy, you can find it HERE
Tube or image of choice, I am using the fantastic artwork of Camilla Drakenborg, you can find them HERE
Scrapkit of choice, I am using a great kit by Tamie called Dreadful Heart, you can find it HERE
Let's Begin!
Open your template
Hit shift d and close the original
Delete raster 2 and 1
Go to Image, Canvas Size and change to 740x650
Colorize rasters 24 and both 15 to match
Select 18
Select all, float, and defloat
Paste paper7 as a new layer
Invert your selection and hit delete
Select none
Delete 18
Repeat for copy of 18
Select 19
Select all, float, and defloat
Paste paper5 as a new layer
Invert your selection and hit delete
Select none
Delete 19
Repeat for 8
Select 20
Select all, float, and defloat
Paste paper11 as a new layer
Invert your selection and hit delete
Select none
Delete 20
Select 14
Select all, float, and defloat
Paste paper4 as a new layer
Invert your selection and hit delete
Select none
Delete 14
Repeat for copy of 14
Add your tube of choice
Resize and position as desired
Add any elements you like
Resize and position
Add any dropshadows you like
Crop and resize as desired
Add your name and copyright
Resize as desired
Save!
Thanks for trying my tut!
Thursday, February 17, 2011
Timeless

This tutorial was written by Kaci on February 17, 2011. Any resemblance to any other tutorials is purely coincidental! You may not copy/paste any part of my tuts elsewhere, but you may text link to them for challenges etc!
Supplies Needed:
Temp105 by Missy, you can find it HERE
Tube or image of choice, I am using the fantastic artwork of Irene Shpak, you can find them HERE
Scrapkit of choice, I am using a great kit by TootyPup called Rustic Romance Steampunk, you can find it HERE
Let's Begin!
Open your template
Hit shift d and close the original
Delete watermark and background
Go to Image, Canvas Size and change to 600x600
Select square1
Select all, float, and defloat
Paste paper2 as a new layer
Invert your selection and hit delete
Select none
Delete square1
Select square2
Select all, float, and defloat
Paste paper25 as a new layer
Invert your selection and hit delete
Select none
Delete square2
Select square3
Select all, float, and defloat
Paste paper17 as a new layer
Invert your selection and hit delete
Select none
Delete square3
Select thin rectangles
Select all, float, and defloat
Paste paper as a new layer
Invert your selection and hit delete
Select none
Delete thin rectangles
Add your tube of choice
Resize and position as desired
Add any elements you like
Resize and position
Add any dropshadows you like
Crop and resize as desired
Add your name and copyright
Resize as desired
Save!
Thanks for trying my tut!
Sunday, February 13, 2011
Love Bugs

This tutorial was written by Kaci on February 13, 2011. Any resemblance to any other tutorials is purely coincidental! You may not copy/paste any part of my tuts elsewhere, but you may text link to them for challenges etc!
Supplies Needed:
Temp140 by Missy, you can find it HERE
Tube or image of choice, I am using the fantastic artwork of Keith Garvey, you can find them HERE
Scrapkit of choice, I am using a great kit by Clarey called Love Bugs, you can find it HERE
Let's Begin!
Open your template
Hit shift d and close the original
Delete by missy and background
Add a new layer and send to the bottom
Select all and paste paper7 into your selection
Select none
Apply mask of choice
Merge group
Select circle2
Select all, float, and defloat
Paste paper9 as a new layer
Invert your selection and hit delete
Select none
Delete circle2
Select thin rectangle1
Select all, float, and defloat
Paste paper2 as a new layer
Invert your selection and hit delete
Select none
Delete thin rectangle1
Select thin rectangle2
Select all, float, and defloat
Paste paper5 as a new layer
Invert your selection and hit delete
Select none
Delete thin rectangle2
Select thin rectangle
Select all, float, and defloat
Paste paper3 as a new layer
Invert your selection and hit delete
Select none
Delete thin rectangle
Select circle
Select all, float, and defloat
Paste paper1 as a new layer
Invert your selection and hit delete
Select none
Delete circle
Add your tube of choice
Resize and position as desired
Add any elements you like
Resize and position
Add any dropshadows you like
Crop and resize as desired
Add your name and copyright
Resize as desired
Save!
Thanks for trying my tut!
Wednesday, February 9, 2011
Wicked Heart

This tutorial was written by Kaci on February 9, 2011. Any resemblance to any other tutorials is purely coincidental! You may not copy/paste any part of my tuts elsewhere, but you may text link to them for challenges etc!
Supplies Needed:
CMTemp3 by Rosey, you can find it HERE on the Creative Misfits Blog
Tube or image of choice, I am using the fantastic artwork of Zindy, you can find them HERE
Scrapkit of choice, I am using a great kit by Vicki called Dark Heart, you can find it HERE
Let's Begin!
Open your template
Hit shift d and close the original
Delete ©layer and white bg
Select rt light pink rect
Select all, float, and defloat
Paste paper7 as a new layer
Invert your selection and hit delete
Select none
Delete rt light pink rect
Repeat for left light pink rect
Select left dk pink rect
Select all, float, and defloat
Paste paper8 as a new layer
Invert your selection and hit delete
Select none
Delete left dk pink rect
Repeat for rt dk pink rect
Select purple rect
Select all, float, and defloat
Paste paper1 as a new layer
Invert your selection and hit delete
Select none
Delete purple rect
Select blue rect
Select all, float, and defloat
Paste paper9 as a new layer
Invert your selection and hit delete
Select none
Delete blue rect
Select pink rect
Select all, float, and defloat
Paste paper4 as a new layer
Invert your selection and hit delete
Select none
Delete pink rect
Select right circle
Select all, float, and defloat
Paste paper2 as a new layer
Invert your selection and hit delete
Select none
Delete right circle
Repeat for left circle
Select white sq
Select all, float, and defloat
Paste paper3 as a new layer
Invert your selection and hit delete
Select none
Delete white sq
Add your tube of choice
Resize and position as desired
Add any elements you like
Resize and position
Add any dropshadows you like
Crop and resize as desired
Add your name and copyright
Resize as desired
Save!
Thanks for trying my tut!
Simply Adorable

This tutorial was written by Kaci on February 9, 2011. Any resemblance to any other tutorials is purely coincidental! You may not copy/paste any part of my tuts elsewhere, but you may text link to them for challenges etc!
Supplies Needed:
Temp7 by Mythical, you can find it HERE
Tube or image of choice, I am using the fantastic artwork of Elias Chatzoudis, you can find them HERE
Scrapkit of choice, I am using a great kit by Tamie called Love Is, you can find it HERE
Plugins: Eye Candy Gradient Glow
Let's Begin!
Open your template
Hit shift d and close the original
Delete ©layer, raster 5, and bg
Coloraize words back to match your kit
Select raster 1
Select all, float, and defloat
Paste paper1 as a new layer
Invert your selection and hit delete
Select none
Delete raster 1
Add a gradient glow of choice
Select raster 2
Select all, float, and defloat
Paste paper4 as a new layer
Invert your selection and hit delete
Select none
Delete raster2
Select raster 3
Select all, float, and defloat
Paste paper3 as a new layer
Invert your selection and hit delete
Select none
Delete raster 3
Select raster 4
Select all, float, and defloat
Paste paper5 as a new layer
Invert your selection and hit delete
Select none
Delete raster 4
Select wordsfront
Select all, float, and defloat
Paste paper1 as a new layer
Invert your selection and hit delete
Select none
Delete wordsfront
Add a small gradient glow of white
Add your tube of choice
Resize and position as desired
Add any elements you like
Resize and position
Add any dropshadows you like
Crop and resize as desired
Add your name and copyright
Resize as desired
Save!
Thanks for trying my tut!
Thursday, February 3, 2011
Make My Heart Melt

This tutorial was written by Kaci on February 3, 2011. Any resemblance to any other tutorials is purely coincidental! You may not copy/paste any part of my tuts elsewhere, but you may text link to them for challenges etc!
Supplies Needed:
Temp98 by Rosey, you can find it HERE
Tube or image of choice, I am using the fantastic artwork of Keith Garvey, you can find them HERE
Scrapkit of choice, I am using a great kit by Tamie called Amour, you can find it HERE
Let's Begin!
Open your template
Hit shift d and close the original
Delete raster 2 and raster 1
Coloraize all dotted lines to match your kit
Select black oval
Select all, float, and defloat
Paste paper10 as a new layer
Invert your selection and hit delete
Select none
Delete black oval
Select dark pink rectangle
Select all, float, and defloat
Paste paper5 as a new layer
Invert your selection and hit delete
Select none
Delete dark pink rectangle
Select pink circles merged
Select all, float, and defloat
Paste paper1 as a new layer
Invert your selection and hit delete
Select none
Delete pink circles merged
Select bottom left black rectangle
Select all, float, and defloat
Paste paper12 as a new layer
Invert your selection and hit delete
Select none
Delete bottom left black rectangle
Repeat for top right black rectangle
Select light pink rectangle
Select all, float, and defloat
Paste paper3 as a new layer
Invert your selection and hit delete
Select none
Delete light pink rectangle
Select pink circle
Select all, float, and defloat
Paste paper7 as a new layer
Invert your selection and hit delete
Select none
Delete pink circle
Add your tube of choice
Resize and position as desired
Add any elements you like
Resize and position
Add any dropshadows you like
Crop and resize as desired
Add your name and copyright
Resize as desired
Save!
Thanks for trying my tut!
Subscribe to:
Posts (Atom)