


Thursday, August 25, 2011
Just Go Away

This tutorial was written by Kaci on August 25, 2011. Any resemblance to any other tutorials is purely coincidental! You may not copy/paste any part of my tuts elsewhere, but you may text link to them for challenges etc!
Supplies Needed:
Temp59 by Aqua, you can find it HERE
Tube or image of choice, I am using the fantastic artwork of Keith Garvey, you need a license to use his images and you can find out more HERE
Scrapkit of choice, I am using a great kit by Rieka Rafita called Free Biker, you can find it HERE
Let's Begin!
Open your template
Hit shift d and close the original
Go to image, canvas size, and change to 700x600
Delete credits, shapes, and background
Colorize halftone, glitter strips, rectangle2, gradient circle, and wordart to match
Select strip1
Select all, float, and defloat
Paste paper5 as a new layer
Invert your selection and hit delete
Select none
Delete strip1
Repeat for strip2 and rectangle1
Select rectangle3
Select all, float, and defloat
Paste paper6 as a new layer
Invert your selection and hit delete
Select none
Delete rectangle3
Select black circle
Select all, float, and defloat
Paste paper8 as a new layer
Invert your selection and hit delete
Select none
Delete black circle
Add your tube of choice
Resize and position as desired
Add any elements you like
Resize and position
Add any dropshadows you like
Crop and resize as desired
Add your name and copyright
Resize as desired
Save!
Thanks for trying my tut!

Thursday, August 11, 2011
Scream It

This tutorial was written by Kaci on August 11, 2011. Any resemblance to any other tutorials is purely coincidental! You may not copy/paste any part of my tuts elsewhere, but you may text link to them for challenges etc!
Supplies Needed:
Temp68 by Aqua, you can find it HERE
Tube or image of choice, I am using the fantastic artwork of Robert Alvarado, you can find these tubes HERE
Scrapkit of choice, I am using a great kit by Rieka Rafita called Kawaii Girl, you can find it HERE
Let's Begin!
Open your template
Hit shift d and close the original
Delete credits and background
Colorize all glitter layers, purple strips, all wordart, and shape to match your kit
Select purple rectangle
Select all, float, and defloat
Paste paper15 as a new layer
Invert your selection and hit delete
Select none
Delete purple rectangle1
Repeat for purple rectangle2
Select purple rectangle3
Select all, float, and defloat
Paste paper2 as a new layer
Invert your selection and hit delete
Select none
Delete purple rectangle3
Repeat for purple rectangle4
Select black rectangle1
Select all, float, and defloat
Paste paper11 as a new layer
Invert your selection and hit delete
Select none
Delete black rectangle1
Repeat for black rectangle2
Select circle1
Select all, float, and defloat
Paste paper4 as a new layer
Invert your selection and hit delete
Select none
Delete circle1
Add any elements you like
Resize and position
Add any dropshadows you like
Crop and resize as desired
Add your name and copyright
Resize as desired
Save!
Thanks for trying my tut!
Tuesday, August 9, 2011
Sweetly Blue

This tutorial was written by Kaci on August 7, 2011. Any resemblance to any other tutorials is purely coincidental! You may not copy/paste any part of my tuts elsewhere, but you may text link to them for challenges etc!
Supplies Needed:
Temp57 by Aqua, you can find it HERE
Tube or image of choice, I am using the fantastic artwork of Barbara Jensen, you can find these tubes HERE
Scrapkit of choice, I am using a great kit by Tamie called Angel Cloud, you can find it HERE
Let's Begin!
Open your template
Hit shift d and close the original
Delete credits, wordart, glitter backing, shape, pixel text, and background
Colorize mask layer to match your kit
Select grad rectangle2
Select all, float, and defloat
Paste paper10 as a new layer
Invert your selection and hit delete
Select none
Delete grad rectangle2
Repeat for grad rectangle1 and black circle
Select grad circle
Select all, float, and defloat
Paste paper6 as a new layer
Invert your selection and hit delete
Select none
Delete grad circle
Add any elements you like
Resize and position
Add any dropshadows you like
Crop and resize as desired
Add your name and copyright
Resize as desired
Save!
Thanks for trying my tut!
Sunday, August 7, 2011
Girls Night Out
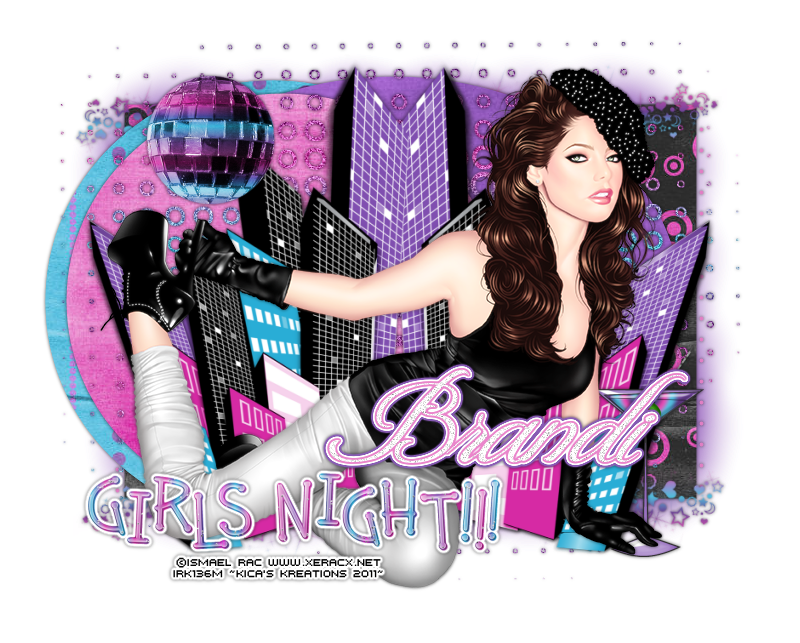
This tutorial was written by Kaci on August 7, 2011. Any resemblance to any other tutorials is purely coincidental! You may not copy/paste any part of my tuts elsewhere, but you may text link to them for challenges etc!
Supplies Needed:
ikissed Temp by Cakes, you can find it HERE
Tube or image of choice, I am using the fantastic artwork of Ismael Rac, you can find these tubes HERE
Scrapkit of choice, I am using a great kit by Grunge N Glitter called Girls Night Out, you can find it HERE Her blog HERE
Let's Begin!
Open your template
Hit shift d and close the original
Delete words, backword, raster 4, ©, and pixel words all
Colorize bottom and middle merged to match your kit
Select raster 3
Select all, float, and defloat
Paste paper4 as a new layer
Invert your selection and hit delete
Select none
Delete raster 3
Select raster 2
Select all, float, and defloat
Paste paper5 as a new layer
Invert your selection and hit delete
Select none
Delete raster 2
Select top merged
Select all, float, and defloat
Paste paper16 as a new layer
Invert your selection and hit delete
Select none
Delete top merged
Select raster 1
Select all, float, and defloat
Paste paper14 as a new layer
Invert your selection and hit delete
Select none
Delete raster 1
Add any elements you like
Resize and position
Add any dropshadows you like
Crop and resize as desired
Add your name and copyright
Resize as desired
Save!
Thanks for trying my tut!
Thursday, August 4, 2011
Emolution

This tutorial was written by Kaci on August 4, 2011. Any resemblance to any other tutorials is purely coincidental! Yo
Supplies Needed:
Collab Temp3 by Tonya n Rosey, you can find it HERE
Tube or image of choice, I am using the fantastic artwork of VeryMany, you can find these tubes HERE
Scrapkit of choice, I am using a great kit by Rieka called I Heart Emo, you can find it HERE
Let's Begin!
Open your template
Hit shift d and close the original
Delete credits, wordart, wordart fill, both heart halves, glitter heart back, and background
Go to Image, Canvas Size, and change to 725x675
Select right shape
Select all, float, and defloat
Paste paper16 as a new layer
Invert your selection and hit delete
Select none
Delete right shape
Repeat for left shape
Select aqua rectangle
Select all, float, and defloat
Paste paper12 as a new layer
Invert your selection and hit delete
Select none
Delete aqua rectangle
Select oval
Select all, float, and defloat
Paste paper1 as a new layer
Invert your selection and hit delete
Select none
Delete oval
Select your black rectangle
Go to Effects, texture, blinds
My settings: width 3, opacity 15, color white, horizontal checked, light from left/top not checked
Add your tube of choice
Resize and position as desired
Add any elements you like
Resize and position
Add any dropshadows you like
Crop and resize as desired
Add your name and copyright
Resize as desired
Save!
Thanks for trying my tut!
Saturday, July 30, 2011
Glitter

This tutorial was written by Kaci on July 30, 2011. Any resemblance to any other tutorials is purely coincidental! You may not copy/paste any part of my tuts elsewhere, but you may text link to them for challenges etc!
Supplies Needed:
Temp406 by Minxy, you can find it HERE
Tube or image of choice, I am using the fantastic artwork of Zindy, you need a license to use her images and you can find out more HERE
Scrapkit of choice, I am using a great kit by Tamie called Glitter, you can find it HERE
Let's Begin!
Open your template
Hit shift d and close the original
Go to image, canvas size, and change to 600x600
Delete by missy and background and stars
Select rect1
Select all, float, and defloat
Paste paper8 as a new layer
Invert your selection and hit delete
Select none
Delete rect1
Repeat for rect2
Select rounded edge rect
Select all, float, and defloat
Paste paper2 as a new layer
Invert your selection and hit delete
Select none
Delete rounded edge rect
Select center rect
Select all, float, and defloat
Paste paper11 as a new layer
Invert your selection and hit delete
Select none
Delete center rect
Select square right
Select all, float, and defloat
Paste paper12 as a new layer
Invert your selection and hit delete
Select none
Delete square right
Repeat for square left
Select center back
Select all, float, and defloat
Paste paper1 as a new layer
Invert your selection and hit delete
Select none
Delete center back
Add noise of choice to frames left and right
Add your tube of choice
Resize and position as desired
Add any elements you like
Resize and position
Add any dropshadows you like
Crop and resize as desired
Add your name and copyright
Resize as desired
Save!
Thanks for trying my tut!
Saturday, July 23, 2011
I Love Diamonds

This tutorial was written by Kaci on July 21, 2011. Any resemblance to any other tutorials is purely coincidental! You may not copy/paste any part of my tuts elsewhere, but you may text link to them for challenges etc!
Supplies Needed:
Temp ccsintox by Cakes, you can find it HERE
Tube or image of choice, I am using the fantastic artwork of Keith Garvey, you can find these tubes HERE
Scrapkit of choice, I am using a great kit by Vicki called Diamonds, you can find it HERE
Let's Begin!
Open your template
Hit shift d and close the original
Delete raster 7 and merged
Select raster 5
Select all, float, and defloat
Paste paper1 as a new layer
Invert your selection and hit delete
Select none
Delete raster 5
Repeat for raster 6
Select raster 3
Select all, float, and defloat
Paste paper3 as a new layer
Invert your selection and hit delete
Select none
Delete raster 3
Repeat for raster 4
Select raster 1
Select all, float, and defloat
Paste paper8 as a new layer
Invert your selection and hit delete
Select none
Delete raster 1
Repeat for raster 2
On your merged layer apply penta VTR2
Change line distance to 23
Change line width to 0
Change contrast to 140
Change ghost to 40
Apply
Add your tube of choice
Resize and position as desired
Add any elements you like
Resize and position
Add any dropshadows you like
Crop and resize as desired
Add your name and copyright
Resize as desired
Save!
Thanks for trying my tut!
Wednesday, July 20, 2011
Bad Ass Princess

This tutorial was written by Kaci on July 20, 2011. Any resemblance to any other tutorials is purely coincidental! You may not copy/paste any part of my tuts elsewhere, but you may text link to them for challenges etc!
Supplies Needed:
Tube of choice, I am using one by VeryMany, you need a license to use these tubes, find out more HERE
Scrap kit of choice, I'm using one by Vicki called Bad Ass Princess, you can find this kit HERE
Masks of choice
Let's Begin!
Open paper3 and hit shift d
Close the original
Promote your background layer to raster layer
Resize to 700x700
Apply your mask of choice
Merge group
Add ele24
Rotate left 90 degrees
With your magic wand, select the insides of your frame
Expand your selection by 5
Below your frame layer paste paper9
Resize paper by 85%
Invert your selection and hit delete
Select none
Add your tube of choice
Resize and position to your liking
Add any other embellishments you like
Add any dropshadows of choice
Add your name and any copyright info you need
Save as png!
Thanks for trying my tut
Pirate's Life

This tutorial was written by Kaci on July 20, 2011. Any resemblance to any other tutorials is purely coincidental! You may not copy/paste any part of my tuts elsewhere, but you may text link to them for challenges etc!
Supplies Needed:
Tube of choice, I am using one by Keith Garvey, you need a license to use his tubes, find out more HERE
Scrap kit of choice, I'm using one by Rieka Rafita called Pirates of the Carribean, you can find this kit HERE
Masks of choice
Let's Begin!
Open paper 4 and hit shift d
Close the original
Promote your background layer to raster layer
Apply your mask of choice
Merge group
Add frame 2
Resize by 90%
With your magic wand, select the insides of your frame
Expand your selection by 3
Below your frame layer paste paper2
Resize paper by 85%
Invert your selection and hit delete
Select none
Add your tube of choice
Resize and position to your liking
Add any other embellishments you like
Add any dropshadows of choice
Add your name and any copyright info you need
Save as png!
Thanks for trying my tut
Friday, July 8, 2011
Oriental Tea Time

This tutorial was written by Kaci on July 8, 2011. Any resemblance to any other tutorials is purely coincidental! You may not copy/paste any part of my tuts elsewhere, but you may text link to them for challenges etc!
Supplies Needed:
Scrap kit of choice, I'm using one by Gemini Creationz called Asian Teahouse, you can find this kit HERE
Masks of choice
Let's Begin!
Open a new image 675x650 at 72 dpi
Select all and paste paper5 into your selection
Apply mask of choice
Merge group
Select all and paste paper12 into your selection
Apply mask of choice
Merge group
Add frame 4
Resize by 75%
With your magic wand, select the insides of your frame
Expand your selection by 5
Below your frame layer paste paper3
Invert your selection and hit delete
Select none
Add geisha
Resize by 75%
Add panda
Resize by 50%
Add any other embellishments you like
Add any dropshadows of choice
Add your name and any copyright info you need
Save as png!
Thanks for trying my tut
Monday, June 27, 2011
CopyCat

This tutorial was written by Kaci on June 27, 2011. Any resemblance to any other tutorials is purely coincidental! You may not copy/paste any part of my tuts elsewhere, but you may text link to them for challenges etc!
Supplies Needed:
Scrap kit of choice, I'm using one by Vicki and Tamie called Copy Cat, you can find this kit HERE
Masks of choice
Let's Begin!
Open a new image 675x650 at 72 dpi
Select all and paste paper1 into your selection
Apply mask of choice
Merge group
Add ele19
Add ele15 below 19
Resize by 90%
Add ele17 above your mask layer
Add ele11 above previous layer
Add your tube of choice
Position to your liking
Add a dropshadow of choice
Add any other embellishments you like
Add your name and any copyright info you need
Save as png!
Thanks for trying my tut
Freedom Isn't Free

This tutorial was written by Kaci on June 27, 2011. Any resemblance to any other tutorials is purely coincidental! You may not copy/paste any part of my tuts elsewhere, but you may text link to them for challenges etc!
Supplies Needed:
Temp106 by Deb, you can find it HERE
Tube or image of choice, I am using the fantastic artwork of Elias Chatzoudis, you can find these tubes HERE
Scrapkit of choice, I am using a great kit by Tamie called USA Girl, you can find it HERE
Let's Begin!
Open your template
Hit shift d and close the original
Delete raster 1
Select 11
Select all, float, and defloat
Paste paper11 as a new layer
Invert your selection and hit delete
Select none
Delete 11
Select 9
Select all, float, and defloat
Paste paper9 as a new layer
Invert your selection and hit delete
Select none
Delete 9
Select 8
Select all, float, and defloat
Paste paper3 as a new layer
Invert your selection and hit delete
Select none
Delete 8
Select 6
Select all, float, and defloat
Paste paper2 as a new layer
Invert your selection and hit delete
Select none
Delete 6
Colorize 3 & 4 to your liking
Add your tube of choice
Resize and position as desired
Add any elements you like
Resize and position
Add any dropshadows you like
Crop and resize as desired
Add your name and copyright
Resize as desired
Save!
Thanks for trying my tut!
Evil Moments

This tutorial was written by Kaci on June 27, 2011. Any resemblance to any other tutorials is purely coincidental! You may not copy/paste any part of my tuts elsewhere, but you may text link to them for challenges etc!
Supplies Needed:
Temp110 by Deb, you can find it HERE
Tube or image of choice, I am using the fantastic artwork of Verymany, you can find these tubes HERE
Scrapkit of choice, I am using a great kit by Tamie called Black Princess, you can find it HERE
Plugins Tramages Tow The Line
Let's Begin!
Open your template
Hit shift d and close the original
Delete raster 1
Select 10
Select all, float, and defloat
Paste paper11 as a new layer
Invert your selection and hit delete
Select none
Delete 10
Select 9
Select all, float, and defloat
Paste paper5 as a new layer
Invert your selection and hit delete
Select none
Delete 9
Select 8
Select all, float, and defloat
Paste paper2 as a new layer
Invert your selection and hit delete
Select none
Delete 8
Apply Tramages Tow The Line on 7 default settings
Select 6
Select all, float, and defloat
Paste paper6 as a new layer
Invert your selection and hit delete
Select none
Delete 6
Select 4
Select all, float, and defloat
Paste paper3 as a new layer
Invert your selection and hit delete
Select none
Delete 4
Colorize 1 to match
Add your tube of choice
Resize and position as desired
Add any elements you like
Resize and position
Add any dropshadows you like
Crop and resize as desired
Add your name and copyright
Resize as desired
Save!
Thanks for trying my tut!
Independent Woman

This tutorial was written by Kaci on June 27, 2011. Any resemblance to any other tutorials is purely coincidental! You may not copy/paste any part of my tuts elsewhere, but you may text link to them for challenges etc!
Supplies Needed:
Temp111 by Deb, you can find it HERE
Tube or image of choice, I am using the fantastic artwork of Keith Garvey, you can find these tubes HERE
Scrapkit of choice, I am using a great kit by Tamie called Independent Woman, you can find it HERE
Let's Begin!
Open your template
Hit shift d and close the original
Delete raster 1, 1, 2, 5, raster 2 shadow 2, 3, 4, 7, and raster 2 shadow 1
Select 11
Select all, float, and defloat
Paste paper9 as a new layer
Invert your selection and hit delete
Select none
Delete 11
Select 9
Select all, float, and defloat
Paste paper4 as a new layer
Invert your selection and hit delete
Select none
Delete 9
Repeat for 10
Select 8
Select all, float, and defloat
Paste paper8 as a new layer
Invert your selection and hit delete
Select none
Delete 8
Colorize 6 to your liking
Add your tube of choice
Resize and position as desired
Add any elements you like
Resize and position
Add any dropshadows you like
Crop and resize as desired
Add your name and copyright
Resize as desired
Save!
Thanks for trying my tut!
I Love PSP

This tutorial was written by Kaci on June 27, 2011. Any resemblance to any other tutorials is purely coincidental! You may not copy/paste any part of my tuts elsewhere, but you may text link to them for challenges etc!
Supplies Needed:
Temp416 by Missy, you can find it HERE
Tube or image of choice, I am using the fantastic artwork of Elias Chatzoudis, you can find these tubes HERE
Scrapkit of choice, I am using a great kit by Tamie called PSP, you can find it HERE
Plugin Penta Color Dot
Let's Begin!
Open your template
Hit shift d and close the original
Delete by missy and background
Select square1
Select all, float, and defloat
Paste paper7 as a new layer
Invert your selection and hit delete
Select none
Delete square1
Select square2
Select all, float, and defloat
Paste paper2 as a new layer
Invert your selection and hit delete
Select none
Delete square2
Select rounded edge rectangle2
Select all, float, and defloat
Paste paper8 as a new layer
Invert your selection and hit delete
Select none
Delete rounded edge rectangle2
Select circle centre
Select all, float, and defloat
Paste paper10 as a new layer
Invert your selection and hit delete
Select none
Delete circle centre
Select frame back
Select all, float, and defloat
Paste paper5 as a new layer
Invert your selection and hit delete
Select none
Delete frame back
Colorize your stars and thin rectangles to match
Apply Penta color dot to both small circles change the distance to 12
Add your tube of choice
Resize and position as desired
Add any elements you like
Resize and position
Add any dropshadows you like
Crop and resize as desired
Add your name and copyright
Resize as desired
Save!
Thanks for trying my tut!
So Captivating

This tutorial was written by Kaci on June 27, 2011. Any resemblance to any other tutorials is purely coincidental! You may not copy/paste any part of my tuts elsewhere, but you may text link to them for challenges etc!
Supplies Needed:
Temp109 by Rosey, you can find it HERE
Tube or image of choice, I am using the fantastic artwork of Celine, you can find these tubes HERE
Scrapkit of choice, I am using a great kit by Tamie called Teacher's Pet, you can find it HERE
Let's Begin!
Open your template
Hit shift d and close the original
Delete credits and raster 2
Select pink square
Select all, float, and defloat
Paste paper12 as a new layer
Invert your selection and hit delete
Select none
Delete pink square
Repeat for pink small rectangles
Select pink circle
Select all, float, and defloat
Paste paper1 as a new layer
Invert your selection and hit delete
Select none
Delete pink circle
Select blue rectangles
Select all, float, and defloat
Paste paper2 as a new layer
Invert your selection and hit delete
Select none
Delete blue rectangles
Repeat for frame pink fill
Colorize square glitter outline fill to white
Select pink square
Select all, float, and defloat
Paste paper9 as a new layer
Invert your selection and hit delete
Select none
Delete pink square
Add noise to your wording and dotted lines
Add your tube of choice
Resize and position as desired
Add any elements you like
Resize and position
Add any dropshadows you like
Crop and resize as desired
Add your name and copyright
Resize as desired
Save!
Thanks for trying my tut!
Saturday, June 25, 2011
Summer Sunset

This tutorial was written by Kaci on June 25, 2011. Any resemblance to any other tutorials is purely coincidental! You may not copy/paste any part of my tuts elsewhere, but you may text link to them for challenges etc!
Supplies Needed:
Temp414 by Missy, you can find it HERE
Tube or image of choice, I am using the fantastic artwork of Robert Freeman, you can find these tubes HERE
Scrapkit of choice, I am using a great kit by Gemini Creationz called Summer Sunset, you can find it HERE
Let's Begin!
Open your template
Hit shift d and close the original
Delete by missy, brush and raster 1
Select square1
Select all, float, and defloat
Paste paper3 as a new layer
Invert your selection and hit delete
Select none
Delete square1
Repeat for square2
Select circle1
Select all, float, and defloat
Paste paper8 as a new layer
Invert your selection and hit delete
Select none
Delete circle1
Repeat for circle3
Select circle2
Select all, float, and defloat
Paste paper4 as a new layer
Invert your selection and hit delete
Select none
Delete circle2
Select frame back
Select all, float, and defloat
Paste paper2 as a new layer
Invert your selection and hit delete
Select none
Delete frame back
Select frame back 2
Select all, float, and defloat
Paste paper1 as a new layer
Invert your selection and hit delete
Select none
Delete frame back 2
Repeat for frame back 3
Add noise of choice to your frames
Add your tube of choice
Resize and position as desired
Add any elements you like
Resize and position
Add any dropshadows you like
Crop and resize as desired
Add your name and copyright
Resize as desired
Save!
Thanks for trying my tut!
Sunday, June 12, 2011
Freshy Lemon

This tutorial was written by Kaci on June 12, 2011. Any resemblance to any other tutorials is purely coincidental! You may not copy/paste any part of my tuts elsewhere, but you may text link to them for challenges etc!
Supplies Needed:
Temp99 by Deb, you can find it HERE
Tube or image of choice, I am using the fantastic artwork of Keith Garvey, you can find these tubes HERE
Scrapkit of choice, I am using a great kit by Stef called Freaky Freshy Lemon, you can find it HERE
Plugin Penta Color Dot
Let's Begin!
Open your template
Hit shift d and close the original
Delete rasters 11, 10, 9, both top rasters 2, 8, 1, 7, copy of 7, & 3
Merge raster 6 and copy of 6 together
Select all, float, and defloat
Paste paper10 as a new layer
Invert your selection and hit delete
Select none
Delete rasters 6
Select raster 4
Select all, float, and defloat
Paste paper12 as a new layer
Invert your selection and hit delete
Select none
Delete raster 4
Repeat for raster 5
Add noise of choice to copy of vector 1
On raster 2 apply Penta color dot, and change the distance to 12
Add your tube of choice
Resize and position as desired
Add any elements you like
Resize and position
Add any dropshadows you like
Crop and resize as desired
Add your name and copyright
Resize as desired
Save!
Thanks for trying my tut!
Tuesday, June 7, 2011
High School Hawtness

This tutorial was written by Kaci on June 7, 2011. Any resemblance to any other tutorials is purely coincidental! You may not copy/paste any part of my tuts elsewhere, but you may text link to them for challenges etc!
Supplies Needed:
startemp1 by Jascie, you can find it HERE
Tube or image of choice, I am using the fantastic artwork of Ismael Rac, you can find these tubes HERE
Scrapkit of choice, I am using a great kit by Tamie called School Hottie, you can find it HERE
Let's Begin!
Open your template
Hit shift d and close the original
Delete watermark
Select star circle
Select all, float, and defloat
Paste paper6 as a new layer
Invert your selection and hit delete
Select none
Delete star circle
Select pink circle
Select all, float, and defloat
Paste paper12 as a new layer
Invert your selection and hit delete
Select none
Delete pink circle
Select white circle
Select all, float, and defloat
Paste paper3 as a new layer
Invert your selection and hit delete
Select none
Delete white circle
Add noise of choice to black star
Select black circle
Select all, float, and defloat
Paste paper8 as a new layer
Invert your selection and hit delete
Select none
Delete black circle
Add your tube of choice
Resize and position as desired
Add any elements you like
Resize and position
Add any dropshadows you like
Crop and resize as desired
Add your name and copyright
Resize as desired
Save!
Thanks for trying my tut!
Sunday, May 29, 2011
Goth Girl

This tutorial was written by Kaci on May 29, 2011. Any resemblance to any other tutorials is purely coincidental! You may not copy/paste any part of my tuts elsewhere, but you may text link to them for challenges etc!
Supplies Needed:
Temp410 by Missy, you can find it HERE
Tube or image of choice, I am using the fantastic artwork of Jose Cano, you can find these tubes HERE
Scrapkit of choice, I am using a great kit by Tamie called Gothic Ellen, you can find it HERE
Plugin: Mura Meister Tone
Let's Begin!
Open your template
Hit shift d and close the original
Delete by missy, stars, and raster 1
Select rectangle1
Select all, float, and defloat
Paste paper5 as a new layer
Invert your selection and hit delete
Select none
Delete rectangle1
Repeat for rectangle2
Select rounded edge rec
Select all, float, and defloat
Paste paper12 as a new layer
Invert your selection and hit delete
Select none
Delete rounded edge rec
Repeat for rounded edge rec2
Select thin rectangle
Select all, float, and defloat
Paste paper9 as a new layer
Invert your selection and hit delete
Select none
Delete thin rectangle
Select frame back
Select all, float, and defloat
Paste paper11 as a new layer
Invert your selection and hit delete
Select none
Delete frame back
Add a new layer above your frame
On your frame select all, float, and defloat
On your new layer apply Mura Meister Tone, default settings
Select none
Lower the opacity to your liking
Add your tube of choice
Resize and position as desired
Add any elements you like
Resize and position
Add any dropshadows you like
Crop and resize as desired
Add your name and copyright
Resize as desired
Save!
Thanks for trying my tut!
Saturday, May 28, 2011
Music Is Life

This tutorial was written by Kaci on May 28, 2011. Any resemblance to any other tutorials is purely coincidental! You may not copy/paste any part of my tuts elsewhere, but you may text link to them for challenges etc!
Supplies Needed:
Temp403 by Missy, you can find it HERE
Tube or image of choice, I am using the fantastic artwork of Keith Garvey, you can find these tubes HERE
Scrapkit of choice, I am using a great kit by Toxic Desirez n Grunge and Glitter called Music Is My Life, you can find it HERE
Plugin: Penta Color Dot
Let's Begin!
Open your template
Hit shift d and close the original
Delete background, and by missy
Go to Image Canvas Size and change to 675x675
Select copy of circle3
Select all, float, and defloat
Paste GNG paper as a new layer
Invert your selection and hit delete
Select none
Delete copy of circle3
Select square
Select all, float, and defloat
Paste GNG paper12 as a new layer
Invert your selection and hit delete
Select none
Delete square
Repeat for both stars, circle1, and thin rect3
Select rectangle1
Select all, float, and defloat
Paste Kristin's paper26 as a new layer
Invert your selection and hit delete
Select none
Delete rectangle1
Select rectangle2
Select all, float, and defloat
Paste Kristin's paper1 as a new layer
Invert your selection and hit delete
Select none
Delete rectangle2
Repeat for circle3
Select thin rectangle1
Select all, float, and defloat
Paste Kristin's paper27 as a new layer
Invert your selection and hit delete
Select none
Delete thin rectangle1
Select thin rectangle2
Select all, float, and defloat
Paste GNG's paper8 as a new layer
Invert your selection and hit delete
Select none
Delete thin rectangle2
Select frame back
Select all, float, and defloat
Paste GNG's paper14 as a new layer
Invert your selection and hit delete
Select none
Delete frame back
On circle2, add penta color dot change the distance to 10
Add noise of choice to frame
Colorize dotted lines to match
Add your tube of choice
Resize and position as desired
Add any elements you like
Resize and position
Add any dropshadows you like
Crop and resize as desired
Add your name and copyright
Resize as desired
Save!
Thanks for trying my tut!
Friday, May 27, 2011
Love Lady Mishka

This tutorial was written by Kaci on May 27, 2011. Any resemblance to any other tutorials is purely coincidental! You may not copy/paste any part of my tuts elsewhere, but you may text link to them for challenges etc!
Supplies Needed:
Tube or image of choice, I am using one by Lady Mishka, which you can these tubes HERE
Scrap kit of choice, I'm using one by Grunge and Glitter called Mishka Maniac, you can find her kit HERE
Masks of choice
Let's Begin!
Open a new image 675x650 at 72 dpi
Select all and paste paper2 into your selection
Apply mask of choice
Merge group
Add cluster frame 2
Resize by 90%
Take your magic wand tool
Tolerance at 20 and feather at 0
Select the inside of your frame
Expand your selection by 6
Add glitter sheet4 below your frame
Invert your selection and hit delete
Select none
Add your tube of choice
Position to your liking
Duplicate and on the dupe layer add a gaussian blur of 2
Change the blend mode on this layer to soft light
Add a dropshadow of choice to your tube original and frame layers
Add any other embellishments you like
Add your name and any copyright info you need
Save as png!
Thanks for trying my tut
Wednesday, May 25, 2011
Dark Princess

This tutorial was written by Kaci on May 25, 2011. Any resemblance to any other tutorials is purely coincidental! You may not copy/paste any part of my tuts elsewhere, but you may text link to them for challenges etc!
Supplies Needed:
Beautiful Temp by Bru, you can find it HERE
Tube or image of choice, I am using the fantastic artwork of Shining Star Art, you can find these tubes HERE
Scrapkit of choice, I am using a great kit by Tamie called Lady Mishka's Nightmare, you can find it HERE
Let's Begin!
Open your template
Hit shift d and close the original
Delete background, all wordart, and raster 1
Select bottom top square
Select all, float, and defloat
Paste paper5 as a new layer
Invert your selection and hit delete
Select none
Delete bottom top square
Repeat for bottom square
Select gray circle
Select all, float, and defloat
Paste paper6 as a new layer
Invert your selection and hit delete
Select none
Delete gray circle
Select top left square
Select all, float, and defloat
Paste paper8 as a new layer
Invert your selection and hit delete
Select none
Delete top left square
Repeat for bottom right square
Select middle dark gray square
Select all, float, and defloat
Paste paper9 as a new layer
Invert your selection and hit delete
Select none
Delete middle dark gray square
Add your tube of choice
Resize and position as desired
Add any elements you like
Resize and position
Add any dropshadows you like
Crop and resize as desired
Add your name and copyright
Resize as desired
Save!
Thanks for trying my tut!
Subscribe to:
Posts (Atom)