




Showing posts with label TammyKat. Show all posts
Showing posts with label TammyKat. Show all posts
Wednesday, March 12, 2014
IB Pinup Toons March 2014 Bonus Tube Show Offs
 7:56 AM |
  Posted by
Kaci
Posted by
Kaci
Good morning! Here are a couple of tags that I have made with TammyKat's IB Pinup Toons March 2014 Bonus Tube kit. You can find out more about this kit and the tube that actually inspired it HERE
You MAY use my tags for inspiration♥



 Labels:

Tuesday, March 4, 2014
Fetish Queen

This tutorial was written by Kaci on March 4, 2013. Any resemblance to any other tutorials is purely coincidental! You may not copy/paste any part of my tuts elsewhere, but you may text link to them for challenges etc!
Supplies Needed:
Tube or image of choice, I am using by Gary Rudisill, you must have a license to use these tubes, which you can find out more HERE
Scrap kit of choice, I'm using one by TammyKat called IB Pinup Toons 177-3, you can find it HERE
Mask of choice
Let's Begin!
Open paper7a
Hit shift d and close the original
Promote background to layer
Resize to 800 on the longest side
Apply mask of choice
Merge group
Duplicate and resize as desired
Add frame1
Rotate 90 degrees to the left
Select the insides of the frame with your magic wand tool, tolerance at 20 and feather at 0, anti alias and contiguous checked
Go to Selections>Modify>Expand by 6
Add paper5 below your frame
Invert your selection and hit delete
Select none
Add any other embellishments you like
Again use my tag for reference
Resize and position
Resize each to your liking
Add any dropshadows of choice
Merge visible
Resize your tag to your liking
Add your name and any copyright info you need
Save as png!
Thanks for trying my tut
Sunday, February 2, 2014
Sweet Love

This tutorial was written by Kaci on February 2, 2014. Any resemblance to any other tutorials is purely coincidental! You may not copy/paste any part of my tuts elsewhere, but you may text link to them for challenges etc!
Supplies Needed:
Temp480 by Millie, you can find it HERE
Tube or image of choice, I am using by Barbara Jensen, this tube is ptu, find out more HERE
Scrapkit of choice, I am using a great kit by TammyKat called Sweet Valentine, you can find it HERE
Penta Color Dot
Let's Begin!
Open your template
Hit shift d and close the original
Delete raster 1 and background, also the wording and hearts
Select 1
Select all, float, and defloat
Paste paper4 as a new layer
Invert your selection and hit delete
Select none
Delete 1
Repeat for 6 & 9
Select 2
Select all, float, and defloat
Paste paper1 as a new layer
Invert your selection and hit delete
Select none
Delete 2
Select 3
Select all, float, and defloat
Paste paper5 as a new layer
Invert your selection and hit delete
Select none
Delete 3
Select 4
Select all, float, and defloat
Paste paper3 as a new layer
Invert your selection and hit delete
Select none
Delete 4
Select 5
Select all, float, and defloat
Paste paper6 as a new layer
Invert your selection and hit delete
Select none
Delete 5
Colorize 8 to match
Apply penta color dot, change the distance to around 8 or to your liking
Add your tube of choice
Resize and position as desired
Add any elements you like
Resize and position
Add any dropshadows you like
Crop and resize as desired
Add your name and copyright
Resize as desired
Save!
Thanks for trying my tut!
Supplies Needed:
Temp480 by Millie, you can find it HERE
Tube or image of choice, I am using by Barbara Jensen, this tube is ptu, find out more HERE
Scrapkit of choice, I am using a great kit by TammyKat called Sweet Valentine, you can find it HERE
Penta Color Dot
Let's Begin!
Open your template
Hit shift d and close the original
Delete raster 1 and background, also the wording and hearts
Select 1
Select all, float, and defloat
Paste paper4 as a new layer
Invert your selection and hit delete
Select none
Delete 1
Repeat for 6 & 9
Select 2
Select all, float, and defloat
Paste paper1 as a new layer
Invert your selection and hit delete
Select none
Delete 2
Select 3
Select all, float, and defloat
Paste paper5 as a new layer
Invert your selection and hit delete
Select none
Delete 3
Select 4
Select all, float, and defloat
Paste paper3 as a new layer
Invert your selection and hit delete
Select none
Delete 4
Select 5
Select all, float, and defloat
Paste paper6 as a new layer
Invert your selection and hit delete
Select none
Delete 5
Colorize 8 to match
Apply penta color dot, change the distance to around 8 or to your liking
Add your tube of choice
Resize and position as desired
Add any elements you like
Resize and position
Add any dropshadows you like
Crop and resize as desired
Add your name and copyright
Resize as desired
Save!
Thanks for trying my tut!
Thursday, October 17, 2013
Halloween Cutie

This tutorial was written by Kaci on October 17, 2013. Any resemblance to any other tutorials is purely coincidental! You may not copy/paste any part of my tuts elsewhere, but you may text link to them for challenges etc!
Supplies Needed:
Template376 by Millie, you can find it HERE
Tube or image of choice, I am using by Pinup Toons, you must have a license to use these tubes, which you can find out more HERE
Scrapkit of choice, I am using a great kit by Tammykat called Gimme Candy, you can find it HERE
Let's Begin!
Open your template
Hit shift d and close the original
Delete raster 1 and background
Add a noise of choice to 9, 8, and 7
Duplicate 5, mirror your copy and move down below 4
Select 1
Select all, float, and defloat
Paste paper8 as a new layer
Invert your selection and hit delete
Select none
Delete 1
Repeat for 2
Select 3
Select all, float, and defloat
Paste paper12 as a new layer
Invert your selection and hit delete
Select none
Delete 3
Select 4
Select all, float, and defloat
Paste paper11 as a new layer
Invert your selection and hit delete
Select none
Delete 4
Select 5
Select all, float, and defloat
Paste paper1 as a new layer
Invert your selection and hit delete
Select none
Delete 5
Repeat for copy of 5
Select 6
Select all, float, and defloat
Paste paper9 as a new layer
Invert your selection and hit delete
Select none
Delete 6
Add your tube of choice
Resize and position as desired
Add any elements you like
Resize and position
Add any dropshadows you like
Crop and resize as desired
Add your name and copyright
Resize as desired
Save!
Thanks for trying my tut!
Supplies Needed:
Template376 by Millie, you can find it HERE
Tube or image of choice, I am using by Pinup Toons, you must have a license to use these tubes, which you can find out more HERE
Scrapkit of choice, I am using a great kit by Tammykat called Gimme Candy, you can find it HERE
Let's Begin!
Open your template
Hit shift d and close the original
Delete raster 1 and background
Add a noise of choice to 9, 8, and 7
Duplicate 5, mirror your copy and move down below 4
Select 1
Select all, float, and defloat
Paste paper8 as a new layer
Invert your selection and hit delete
Select none
Delete 1
Repeat for 2
Select 3
Select all, float, and defloat
Paste paper12 as a new layer
Invert your selection and hit delete
Select none
Delete 3
Select 4
Select all, float, and defloat
Paste paper11 as a new layer
Invert your selection and hit delete
Select none
Delete 4
Select 5
Select all, float, and defloat
Paste paper1 as a new layer
Invert your selection and hit delete
Select none
Delete 5
Repeat for copy of 5
Select 6
Select all, float, and defloat
Paste paper9 as a new layer
Invert your selection and hit delete
Select none
Delete 6
Add your tube of choice
Resize and position as desired
Add any elements you like
Resize and position
Add any dropshadows you like
Crop and resize as desired
Add your name and copyright
Resize as desired
Save!
Thanks for trying my tut!
Saturday, September 14, 2013
Witchy Poo

This tutorial was written by Kaci on September 14, 2013. Any resemblance to any other tutorials is purely coincidental! You may not copy/paste any part of my tuts elsewhere, but you may text link to them for challenges etc!
Supplies Needed:
Template95 by Kristin, you can find it HERE
Tube or image of choice, I am using by Elias Chatzoudis, you must have a license to use these tubes, which you can find out more HERE
Scrapkit of choice, I am using a great kit by TammyKat called Witchy Poo, which you can find it HERE
Plugins: Eye Candy Gradient Glow
Mask of choice, I used one by Vix
Let's Begin!
Open your template
Hit shift d and close the original
Delete credits, bats, face, and bg
Resize your image, all layers, to 700 pixels on the longest side
Go to Image, Canvas Size, and change to 750x725
Select doodles
Select all, float, and defloat
Paste paper5 as a new layer
Invert your selection and hit delete
Select none
Delete doodles
Select circle
Select all, float, and defloat
Paste paper9 as a new layer
Invert your selection and hit delete
Select none
Delete circle
Select stars
Select all, float, and defloat
Paste paper4 as a new layer
Invert your selection and hit delete
Select none
Delete stars
Select wordart
Select all, float, and defloat
Paste paper as a new layer
Invert your selection and hit delete
Select none
Delete wordart
Give your wordart a gradient glow with eye candy, I used default fat, changing the color to white, width at 4
Add a new layer and send to the bottom
Select all and paste paper2 into your selection
Deselect all
Apply mask of choice
Merge group
Add your tube of choice
Resize and position as desired
Add any elements you like
Resize and position
Add any dropshadows you like
Crop and resize as desired
Add your name and copyright
Resize as desired
Save!
Thanks for trying my tut!
Supplies Needed:
Template95 by Kristin, you can find it HERE
Tube or image of choice, I am using by Elias Chatzoudis, you must have a license to use these tubes, which you can find out more HERE
Scrapkit of choice, I am using a great kit by TammyKat called Witchy Poo, which you can find it HERE
Plugins: Eye Candy Gradient Glow
Mask of choice, I used one by Vix
Let's Begin!
Open your template
Hit shift d and close the original
Delete credits, bats, face, and bg
Resize your image, all layers, to 700 pixels on the longest side
Go to Image, Canvas Size, and change to 750x725
Select doodles
Select all, float, and defloat
Paste paper5 as a new layer
Invert your selection and hit delete
Select none
Delete doodles
Select circle
Select all, float, and defloat
Paste paper9 as a new layer
Invert your selection and hit delete
Select none
Delete circle
Select stars
Select all, float, and defloat
Paste paper4 as a new layer
Invert your selection and hit delete
Select none
Delete stars
Select wordart
Select all, float, and defloat
Paste paper as a new layer
Invert your selection and hit delete
Select none
Delete wordart
Give your wordart a gradient glow with eye candy, I used default fat, changing the color to white, width at 4
Add a new layer and send to the bottom
Select all and paste paper2 into your selection
Deselect all
Apply mask of choice
Merge group
Add your tube of choice
Resize and position as desired
Add any elements you like
Resize and position
Add any dropshadows you like
Crop and resize as desired
Add your name and copyright
Resize as desired
Save!
Thanks for trying my tut!
Wednesday, September 4, 2013
Fall Harvest

This tutorial was written by Kaci on September 4, 2013. Any resemblance to any other tutorials is purely coincidental! You may not copy/paste any part of my tuts elsewhere, but you may text link to them for challenges etc!
Supplies Needed:
Template378 by Minxy, you can find it HERE
Tube or image of choice, I am using by Pinup Toons, you must have a license to use these tubes, which you can find out more HERE
Scrapkit of choice, I am using a great kit by TammyKat called Autumn Days, which you can find it HERE
Let's Begin!
Open your template
Hit shift d and close the original
Delete by missy, rectangle, and background
Now resize all layers checked, and smart size to 700 pixels on the longest side
Go to Image, Canvas Size, and change to 725x725
Select square4
Select all, float, and defloat
Paste paper brown as a new layer
Invert your selection and hit delete
Select none
Delete square4
Repeat for square5
Select thin rectangle
Select all, float, and defloat
Paste paper plaid as a new layer
Invert your selection and hit delete
Select none
Delete thin rectangle
Select square1
Select all, float, and defloat
Paste paper red as a new layer
Invert your selection and hit delete
Select none
Delete square1
Repeat for square2
Select circle1
Select all, float, and defloat
Paste paper damask1 as a new layer
Invert your selection and hit delete
Select none
Delete circle1
Repeat for circle2
Select square3
Select all, float, and defloat
Paste paper green as a new layer
Invert your selection and hit delete
Select none
Delete square3
Add noise of choice to both hearts
Add your tube of choice
Resize and position as desired
Add any elements you like
Resize and position
Add any dropshadows you like
Crop and resize as desired
Add your name and copyright
Resize as desired
Save!
Thanks for trying my tut!
Supplies Needed:
Template378 by Minxy, you can find it HERE
Tube or image of choice, I am using by Pinup Toons, you must have a license to use these tubes, which you can find out more HERE
Scrapkit of choice, I am using a great kit by TammyKat called Autumn Days, which you can find it HERE
Let's Begin!
Open your template
Hit shift d and close the original
Delete by missy, rectangle, and background
Now resize all layers checked, and smart size to 700 pixels on the longest side
Go to Image, Canvas Size, and change to 725x725
Select square4
Select all, float, and defloat
Paste paper brown as a new layer
Invert your selection and hit delete
Select none
Delete square4
Repeat for square5
Select thin rectangle
Select all, float, and defloat
Paste paper plaid as a new layer
Invert your selection and hit delete
Select none
Delete thin rectangle
Select square1
Select all, float, and defloat
Paste paper red as a new layer
Invert your selection and hit delete
Select none
Delete square1
Repeat for square2
Select circle1
Select all, float, and defloat
Paste paper damask1 as a new layer
Invert your selection and hit delete
Select none
Delete circle1
Repeat for circle2
Select square3
Select all, float, and defloat
Paste paper green as a new layer
Invert your selection and hit delete
Select none
Delete square3
Add noise of choice to both hearts
Add your tube of choice
Resize and position as desired
Add any elements you like
Resize and position
Add any dropshadows you like
Crop and resize as desired
Add your name and copyright
Resize as desired
Save!
Thanks for trying my tut!
Monday, June 3, 2013
Dahlia

This tutorial was written by Kaci on June 3, 2013. Any resemblance to any other tutorials is purely coincidental! You may not copy/paste any part of my tuts elsewhere, but you may text link to them for challenges etc!
Supplies Needed:
Template168 by Kristin, you can find it HERE
Tube or image of choice, I am using by Pinup Toons, you must have a license to use these tubes, which you can find out more HERE
Scrapkit of choice, I am using a great kit by TammyKat called Dahlia, which you can find it HERE
Let's Begin!
Open your template
Hit shift d and close the original
Delete credits and background
Select left square
Select all, float, and defloat
Paste paper1 as a new layer
Invert your selection and hit delete
Select none
Delete left square
Repeat for right square
Select pink top rectangle
Select all, float, and defloat
Paste paper5 as a new layer
Invert your selection and hit delete
Select none
Delete pink top rectangle
Repeat for pink bottom rectangle
Select blue top rectangle
Select all, float, and defloat
Paste paper6 as a new layer
Invert your selection and hit delete
Select none
Delete blue top rectangle
Repeat for blue bottom rectangle
Select rounded rectangle
Select all, float, and defloat
Paste paper3 as a new layer
Invert your selection and hit delete
Select none
Delete rounded rectangle
Select circle
Select all, float, and defloat
Paste paper4 as a new layer
Invert your selection and hit delete
Select none
Delete circle
Add your tube of choice
Resize and position as desired
Add any elements you like
Resize and position
Add any dropshadows you like
Crop and resize as desired
Add your name and copyright
Resize as desired
Save!
Thanks for trying my tut!
Supplies Needed:
Template168 by Kristin, you can find it HERE
Tube or image of choice, I am using by Pinup Toons, you must have a license to use these tubes, which you can find out more HERE
Scrapkit of choice, I am using a great kit by TammyKat called Dahlia, which you can find it HERE
Let's Begin!
Open your template
Hit shift d and close the original
Delete credits and background
Select left square
Select all, float, and defloat
Paste paper1 as a new layer
Invert your selection and hit delete
Select none
Delete left square
Repeat for right square
Select pink top rectangle
Select all, float, and defloat
Paste paper5 as a new layer
Invert your selection and hit delete
Select none
Delete pink top rectangle
Repeat for pink bottom rectangle
Select blue top rectangle
Select all, float, and defloat
Paste paper6 as a new layer
Invert your selection and hit delete
Select none
Delete blue top rectangle
Repeat for blue bottom rectangle
Select rounded rectangle
Select all, float, and defloat
Paste paper3 as a new layer
Invert your selection and hit delete
Select none
Delete rounded rectangle
Select circle
Select all, float, and defloat
Paste paper4 as a new layer
Invert your selection and hit delete
Select none
Delete circle
Add your tube of choice
Resize and position as desired
Add any elements you like
Resize and position
Add any dropshadows you like
Crop and resize as desired
Add your name and copyright
Resize as desired
Save!
Thanks for trying my tut!
Sunday, May 12, 2013
Undeniably Sexy

This tutorial was written by Kaci on May 12, 2013. Any resemblance to any other tutorials is purely coincidental! You may not copy/paste any part of my tuts elsewhere, but you may text link to them for challenges etc!
Supplies Needed:
Template245 by Millie, you can find it HERE
Tube or image of choice, I am using by Ismael Rac, you must have a license to use these tubes, which you can find out more HERE
Scrapkit of choice, I am using a great kit by TammyKat called Pink Sugar, which you can find it HERE
Let's Begin!
Open your template
Hit shift d and close the original
Delete raster 1 and background
Go to Image, Canvas Size, and change to 725x725
Select 1
Select all, float, and defloat
Paste paper10 as a new layer
Invert your selection and hit delete
Select none
Delete 1
Select 2
Select all, float, and defloat
Paste paper9 as a new layer
Invert your selection and hit delete
Select none
Delete 2
Select 3
Select all, float, and defloat
Paste paper8 as a new layer
Invert your selection and hit delete
Select none
Delete 3
Select 4
Select all, float, and defloat
Paste paper5 as a new layer
Invert your selection and hit delete
Select none
Delete 4
Select 5
Select all, float, and defloat
Paste paper9 as a new layer
Invert your selection and hit delete
Select none
Delete 5
Select 7
Select all, float, and defloat
Paste paper7 as a new layer
Invert your selection and hit delete
Select none
Delete 7
Select 8
Select all, float, and defloat
Paste paper3 as a new layer
Invert your selection and hit delete
Select none
Delete 8
Add your tube of choice
Resize and position as desired
Add any elements you like
Resize and position
Add any dropshadows you like
Crop and resize as desired
Add your name and copyright
Resize as desired
Save!
Thanks for trying my tut!
Friday, April 26, 2013
Aloha Babe

This tutorial was written by Kaci on April 26, 2013. Any resemblance to any other tutorials is purely coincidental! You may not copy/paste any part of my tuts elsewhere, but you may text link to them for challenges etc!
Supplies Needed:
Tube of choice, I am using one by the amazing Michael Landefeld, you need a license to use these tubes, you can find out all about that HERE
Scrap kit of choice, I'm using one by TammyKat called Hibiscus and AddOn, you can find this kit HERE
Mask of choice
Let's Begin!
Start out by opening clusterframe 3
Hit shift D on your keyboard and close the original
Resize your frame, all layers checked, set to Smart Size, to 700 on the longest side
Go to Image, Canvas Size and change it to 725x725
You can resize it later if you like :)
Add a new layer and send to the bottom
Select all and paste paper4 into your selection
Select none
Apply mask of choice
Merge group
Resize your mask and position differently if desired
Select your magic wand tool, make sure tolerance is at 20 and feather 0, mode add and contiguous checked
Select so that the inner frame is fully selected
Modify and expand your selection by 6
Add paper3 below your frame
Invert your selection and hit delete
Add your tube and position, use my tag as reference
Add a drop shadow of your choice to your frame
Add any other embellishments you like
Again use my tag for reference
Resize each to your liking
Add any dropshadows of choice
Add your name and any copyright info you need
Save as png!
Thanks for trying my tut
Friday, April 5, 2013
Super Cutie

This tutorial was written by Kaci on April 5, 2013. Any resemblance to any other tutorials is purely coincidental! You may not copy/paste any part of my tuts elsewhere, but you may text link to them for challenges etc!
Supplies Needed:
Tube of choice, I am using one by the amazing Pinup Toons, you need a license to use these tubes, you can find out all about that HERE
Scrap kit of choice, I'm using one by TammyKat called IB-Pinup Toons 162-3, you can find this kit HERE
Mask of choice
Let's Begin!
Start out by opening clusterframe 1
Hit shift D on your keyboard and close the original
Resize your frame, all layers checked, set to Smart Size, to 700 on the longest side
Go to Image, Canvas Size and change it to 800x800
Add a new layer and send to the bottom
Select all and paste paper5 into your selection
Select none
Apply mask of choice
Merge group
Resize your mask and position differently if desired
Select your magic wand tool, make sure tolerance is at 20 and feather 0, mode add and contiguous checked
Change your selection type to ellipse
Select so that the inner frame is fully selected
Add paper1 below your frame
Invert your selection and hit delete
Add your tube and position, use my tag as reference
Add a drop shadow of your choice to your frame
Add any other embellishments you like
Again use my tag for reference
Resize each to your liking
Add any dropshadows of choice
Add your name and any copyright info you need
Save as png!
Thanks for trying my tut
Saturday, March 23, 2013
Not So Innocent

This tutorial was written by Kaci on March 23, 2013. Any resemblance to any other tutorials is purely coincidental! You may not copy/paste any part of my tuts elsewhere, but you may text link to them for challenges etc!
Supplies Needed:
Template 164 by Pooker, you can find it HERE
Tube or image of choice, I am using by Caron Vinson, you must have a license to use these tubes, which you can find out more HERE
Scrapkit of choice, I am using a great kit by Tammy Kat called IB Caron Vinson 66-1, which you can find it HERE
Let's Begin!
Open your template
Hit shift d and close the original
Delete cr info, lt purple circles, white dotted circles 5, and bg layers
Colorize pink dotted circle to match
Select purple circles
Select all, float, and defloat
Paste paper5 as a new layer
Invert your selection and hit delete
Select none
Delete purple circles
Select pink circles
Select all, float, and defloat
Paste paper4 as a new layer
Invert your selection and hit delete
Select none
Delete pink circles
Select lt pink circles
Select all, float, and defloat
Paste paper2 as a new layer
Invert your selection and hit delete
Select none
Delete lt pink circles
Select white circle
Select all, float, and defloat
Paste paper3 as a new layer
Invert your selection and hit delete
Select none
Delete white circle
Select lt purple circle
Select all, float, and defloat
Paste paper5 as a new layer
Invert your selection and hit delete
Select none
Delete lt purple circle
Add your tube of choice
Resize and position as desired
Add any elements you like
Resize and position
Add any dropshadows you like
Crop and resize as desired
Add your name and copyright
Resize as desired
Save!
Thanks for trying my tut!
Tuesday, February 19, 2013
Sugar Sugar

This tutorial was written by Kaci on February 19, 2013. Any resemblance to any other tutorials is purely coincidental! You may not copy/paste any part of my tuts elsewhere, but you may text link to them for challenges etc!
Supplies Needed:
Tube of choice, I am using one by the amazing Martin Abel, you need a license to use his tubes, you can find out all about that HERE
Scrap kit of choice, I'm using one by TammyKat called Sugar Rush, you can find this kit HERE
I also used a ftu cluster made with Tammy's kit by Christene, which you can download on her blog HERE
Supplies Needed:
Tube of choice, I am using one by the amazing Martin Abel, you need a license to use his tubes, you can find out all about that HERE
Scrap kit of choice, I'm using one by TammyKat called Sugar Rush, you can find this kit HERE
I also used a ftu cluster made with Tammy's kit by Christene, which you can download on her blog HERE
Mask of choice
Let's Begin!
Start out by opening her cluster frame freebie
Hit ctrl D on your keyboard and close the original
On the new image, resize all layers to 700x700
Select your magic wand tool, make sure tolerance is at 20 and feather 0, mode add and contiguous checked
Select the inside parts of the frame
Now go to Selections, Modify, Expand
Expand your selection by 10 pixels
Add paper3 below your frame
Resize by 75% uncheck all layers
Invert your selection and hit delete
Select none
Add your tube as the top layer and position *use my tag as reference*
Duplicate your tube and change the top layers blend mode to soft light
Add a drop shadow of your choice to your frame and tube layers
Add your tube closeup between the cluster and inner frame paper
Change the blend mode to overlay and drop the opacity to around 70 or so
Erase the bits that overhand the frame :)
Add a new layer and send to the bottom
Select all and paste paper6 into your selection
Select none
Apply mask of choice
Merge group
Duplicate your mask as desired
Add any other embellishments you like
I used the following
element10b, element10c, element14, element18c, and element18b
Resize each to your liking
Add any dropshadows of choice
Add your name and any copyright info you need
Save as png!
Thanks for trying my tut
Let's Begin!
Start out by opening her cluster frame freebie
Hit ctrl D on your keyboard and close the original
On the new image, resize all layers to 700x700
Select your magic wand tool, make sure tolerance is at 20 and feather 0, mode add and contiguous checked
Select the inside parts of the frame
Now go to Selections, Modify, Expand
Expand your selection by 10 pixels
Add paper3 below your frame
Resize by 75% uncheck all layers
Invert your selection and hit delete
Select none
Add your tube as the top layer and position *use my tag as reference*
Duplicate your tube and change the top layers blend mode to soft light
Add a drop shadow of your choice to your frame and tube layers
Add your tube closeup between the cluster and inner frame paper
Change the blend mode to overlay and drop the opacity to around 70 or so
Erase the bits that overhand the frame :)
Add a new layer and send to the bottom
Select all and paste paper6 into your selection
Select none
Apply mask of choice
Merge group
Duplicate your mask as desired
Add any other embellishments you like
I used the following
element10b, element10c, element14, element18c, and element18b
Resize each to your liking
Add any dropshadows of choice
Add your name and any copyright info you need
Save as png!
Thanks for trying my tut

Monday, October 22, 2012
Bewitched
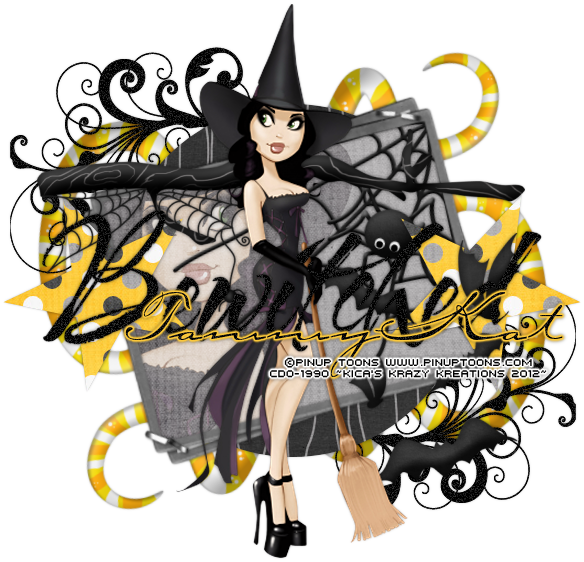
This tutorial was written by Kaci on October 22, 2012. Any resemblance to any other tutorials is purely coincidental! You may not copy/paste any part of my tuts elsewhere, but you may text link to them for challenges etc!
Supplies Needed:
Temp 95 by Kristin, you can find it HERE
Tube or image of choice, I am using a tube by Pinup Toons and you must have permission to use them, you can find out more HERE
Scrapkit of choice, I am using a great kit by TammyKat called October Bonus Freebie Inspired by Concetta Kilmer, which you can find it HERE and it's FREE!!! Scroll to the bottom of the post for the download link :)
Let's Begin!
Open your template
Hit shift d and close the original
Delete credits, face, bats, and background
Go to Image, Canvas Size, and change to 700x700 centered
Apply noise of choice to your doodles and wordart
Select circle
Select all, float, and defloat
Paste paper1 as a new layer
Invert your selection and hit delete
Select non
Delete circle
Select stars
Select all, float, and defloat
Paste paper2 as a new layer
Invert your selection and hit delete
Select non
Delete stars
Add your tube of choice
Resize as desired
Add any elements you like
Resize and position
Add any dropshadows you like
Crop and resize as desired
Add your name and copyright
Resize as desired
Save!
Thanks for trying my tut!
Supplies Needed:
Temp 95 by Kristin, you can find it HERE
Tube or image of choice, I am using a tube by Pinup Toons and you must have permission to use them, you can find out more HERE
Scrapkit of choice, I am using a great kit by TammyKat called October Bonus Freebie Inspired by Concetta Kilmer, which you can find it HERE and it's FREE!!! Scroll to the bottom of the post for the download link :)
Let's Begin!
Open your template
Hit shift d and close the original
Delete credits, face, bats, and background
Go to Image, Canvas Size, and change to 700x700 centered
Apply noise of choice to your doodles and wordart
Select circle
Select all, float, and defloat
Paste paper1 as a new layer
Invert your selection and hit delete
Select non
Delete circle
Select stars
Select all, float, and defloat
Paste paper2 as a new layer
Invert your selection and hit delete
Select non
Delete stars
Add your tube of choice
Resize as desired
Add any elements you like
Resize and position
Add any dropshadows you like
Crop and resize as desired
Add your name and copyright
Resize as desired
Save!
Thanks for trying my tut!
Pirate's Trick or Treat

This tutorial was written by Kaci on October 22, 2012. Any resemblance to any other tutorials is purely coincidental! You may not copy/paste any part of my tuts elsewhere, but you may text link to them for challenges etc!
Supplies Needed:
Temp 90 by Kristin, you can find it HERE
Tube or image of choice, I am using a tube by Ismael Rac and you must have permission to use them, you can find out more HERE
Scrapkit of choice, I am using a great kit by TammyKat called Pirate Punk, which you can find it HERE and it's FREE!!!
Mask of choice
Let's Begin!
Open your template
Hit shift d and close the original
Delete credits, pumpkin, and background
Resize all layers to 700 pixels on longest side
Go to Image, Canvas Size, and change to 725x650 centered
Add a new layer and send to the bottom
Select all and paste solidpaper1 into your selection
Select none
Apply mask of choice
Merge group
Apply noise of choice to your doodle layer
Select rectangle
Select all, float, and defloat
Paste blkpaper2 as a new layer
Invert your selection and hit delete
Delete rectangle
Invert your selection again
Paste solidpaper2 above your rectangle layer
Expand your selection by 3
Invert and hit delete
Invert again
Contract your selection by 10
Hit delete
Select none
Add noise of choice again to your wordart
Add your tube of choice
Resize as desired
Add any elements you like
Resize and position
Add any dropshadows you like
Crop and resize as desired
Add your name and copyright
Resize as desired
Save!
Thanks for trying my tut!
Supplies Needed:
Temp 90 by Kristin, you can find it HERE
Tube or image of choice, I am using a tube by Ismael Rac and you must have permission to use them, you can find out more HERE
Scrapkit of choice, I am using a great kit by TammyKat called Pirate Punk, which you can find it HERE and it's FREE!!!
Mask of choice
Let's Begin!
Open your template
Hit shift d and close the original
Delete credits, pumpkin, and background
Resize all layers to 700 pixels on longest side
Go to Image, Canvas Size, and change to 725x650 centered
Add a new layer and send to the bottom
Select all and paste solidpaper1 into your selection
Select none
Apply mask of choice
Merge group
Apply noise of choice to your doodle layer
Select rectangle
Select all, float, and defloat
Paste blkpaper2 as a new layer
Invert your selection and hit delete
Delete rectangle
Invert your selection again
Paste solidpaper2 above your rectangle layer
Expand your selection by 3
Invert and hit delete
Invert again
Contract your selection by 10
Hit delete
Select none
Add noise of choice again to your wordart
Add your tube of choice
Resize as desired
Add any elements you like
Resize and position
Add any dropshadows you like
Crop and resize as desired
Add your name and copyright
Resize as desired
Save!
Thanks for trying my tut!
Friday, September 21, 2012
Here Kitty Kitty

This tutorial was written by Kaci on September 21, 2012. Any resemblance to any other tutorials is purely coincidental! You may not copy/paste any part of my tuts elsewhere, but you may text link to them for challenges etc!
Supplies Needed:
Template 162 by Kristin, you can find it HERE
Tube or image of choice, I am using a tube by Elias Chatzoudis and you must have permission to use them, you can find out more HERE
Scrapkit of choice, I am using a great kit by TammyKat called Here Kitty Kitty, which you can find it at http://tkdezigns.blogspot.com/
Let's Begin!
Open your template
Hit shift d and close the original
Delete credits, hearts, stars, words, and background
Colorize your dotted lines to match
Select rectangle
Select all, float, and defloat
Paste gradientpaper as a new layer
Invert your selection and hit delete
Select none
Delete rectangle
Select circle1
Select all, float, and defloat
Paste paper darkpink as a new layer
Invert your selection and hit delete
Select none
Delete circle1
Select right square
Select all, float, and defloat
Paste paper herekittykitty as a new layer
Invert your selection and hit delete
Select none
Delete right square
Repeat for left square
Select circle2
Select all, float, and defloat
Paste paperltpink as a new layer
Invert your selection and hit delete
Select none
Delete circle2
Add your tube of choice
Resize as desired
Duplicate your tube
On your dupe layer, change your blend mode to hard light and lower the opacity to around 50 or so
Add any elements you like
Resize and position
Add any dropshadows you like
Crop and resize as desired
Add your name and copyright
Resize as desired
Save!
Thanks for trying my tut!
Supplies Needed:
Template 162 by Kristin, you can find it HERE
Tube or image of choice, I am using a tube by Elias Chatzoudis and you must have permission to use them, you can find out more HERE
Scrapkit of choice, I am using a great kit by TammyKat called Here Kitty Kitty, which you can find it at http://tkdezigns.blogspot.com/
Let's Begin!
Open your template
Hit shift d and close the original
Delete credits, hearts, stars, words, and background
Colorize your dotted lines to match
Select rectangle
Select all, float, and defloat
Paste gradientpaper as a new layer
Invert your selection and hit delete
Select none
Delete rectangle
Select circle1
Select all, float, and defloat
Paste paper darkpink as a new layer
Invert your selection and hit delete
Select none
Delete circle1
Select right square
Select all, float, and defloat
Paste paper herekittykitty as a new layer
Invert your selection and hit delete
Select none
Delete right square
Repeat for left square
Select circle2
Select all, float, and defloat
Paste paperltpink as a new layer
Invert your selection and hit delete
Select none
Delete circle2
Add your tube of choice
Resize as desired
Duplicate your tube
On your dupe layer, change your blend mode to hard light and lower the opacity to around 50 or so
Add any elements you like
Resize and position
Add any dropshadows you like
Crop and resize as desired
Add your name and copyright
Resize as desired
Save!
Thanks for trying my tut!
Tuesday, August 28, 2012
Heart Breaker

This tutorial was written by Kaci on August 28, 2012. Any resemblance to any other tutorials is purely coincidental! You may not copy/paste any part of my tuts elsewhere, but you may text link to them for challenges etc!
Supplies Needed:
Template 177 by Kristin, you can find it HERE
Tube or image of choice, I am using a tube by Josh Howard, these tubes are FREE but you must have permission to use them, you can find out more HERE
Scrapkit of choice, I am using a great kit by Tammy Kat called Break Your Heart, which you can find it HERE
Texture of choice
Xero Porcelain
Let's Begin!
Open your template
Hit shift d and close the original
Delete cr info and background
Now we are gonna merge some layers
Merge ANY layers that are top/bottom or left/right etc
Example merge top black square with bottom black square and so on
Now you should only have 5 total layers
Yes? Great! Lets make this tag
Select your bottom layer
Select all, float, and defloat
Paste heart paper2 as a new layer
Resize by 110%
Invert your selection and hit delete
Select none
Delete your bottom layer
Select the next layer up
Mine says top red circle :)
Select all, float, and defloat
Paste checked paper1 as a new layer
Invert your selection and hit delete
Select none
Delete top red circle
Select top red rectangle *middle layer*
Select all, float, and defloat
Paste blackpp as a new layer
Resize by 110% again
Invert your selection and hit delete
Select none
Delete top red rectangle
Select round rectangle
Select all, float, and defloat
Paste gradient paper as a new layer
Invert your selection and hit delete
Delete round rectangle
Now invert your selection again
Above your gradient paper layer
Paste your texture of choice as a new layer
Depending on size, you'll want to resize to your liking
Invert your selection again and hit delete
Now you may deselect
Now, I greyscaled mine but that's not technically necessary
Depending on the coloring of your texture
Change the blend mode to one of your liking
Change the opacity if you like
I also applied Xero Porcelain default to my texture but that is up to you!
Select circle
Select all, float, and defloat
Paste heartbreaker paper as a new layer
Invert your selection and hit delete
Select none
Delete circle
Add your tube of choice
Resize by 120%
Duplicate your tube
On your dupe layer, change your blend mode to overlay and lower the opacity to around 75 or so
Add any elements you like
Resize and position
Add any dropshadows you like
Crop and resize as desired
Add your name and copyright
Resize as desired
Save!
Thanks for trying my tut!
Wednesday, June 20, 2012
Sweet As Cake

This tutorial was written by Kaci on June 20, 2012. Any resemblance to any other tutorials is purely coincidental! You may not copy/paste any part of my tuts elsewhere, but you may text link to them for challenges etc!
Supplies Needed:
Template 94 by Kat, you can find it HERE
Tube or image of choice, I am using a tube by the always fabulous Verymany, you must have a license to use these tubes, which you can find out more HERE
Scrapkit of choice, I am using a great kit by TammyKat called Sweet As Cake, which you can find it HERE
Mask of choice
Let's Begin!
Open your template
Hit shift d and close the original
Resize all layers to 700 pixels on longest side, smart size
Delete blissfully beth and raster 1
Add a new layer and send to the bottom
Select all and paste paper2 into your selection
Select none
Apply mask of choice
Merge group
Duplicate if desired
Select frame bg
Select all, float, and defloat
Paste paper4 as a new layer
Invert your selection and hit delete
Select none
Delete frame bg
Select black frame
Select all, float, and defloat
Paste paper2 as a new layer
Invert your selection and hit delete
Select none
Delete black frame
Select vert lines 2
Select all, float, and defloat
Paste paper as a new layer
Invert your selection and hit delete
Select none
Delete vert lines 2
Repeat for vert lines 1, I mirrored mine
Add noise of choice to dotted lines
Add your tube of choice
Resize and position as desired
Add any elements you like
Resize and position
Add any dropshadows you like
Crop and resize as desired
Add your name and copyright
Resize as desired
Save!
Thanks for trying my tut!
Saturday, June 9, 2012
Wild Thang

This tutorial was written by Kaci on June 9, 2012. Any resemblance to any other tutorials is purely coincidental! You may not copy/paste any part of my tuts elsewhere, but you may text link to them for challenges etc!
Supplies Needed:
Template 137 by Leah, you can find it HERE
Tube or image of choice, I am using a tube from the fabulous Robert Alvarado, you must have a license to use these tubes, which you can find out more HERE
Scrapkit of choice, I am using a great kit by TammyKat called Wild Thang, which you can find it HERE
Let's Begin!
Open your template
Hit shift d and close the original
Resize all layers Smart Size to 675 on width
Delete credits and raster 1
Go to Image, Canvas Size and change to 725x725 centered
Select 12
Select all, float, and defloat
Paste paper solidltpink as a new layer
Invert your selection and hit delete
Select none
Delete 12
Repeat for 11
Select 10
Select all, float, and defloat
Paste paper pink zebra print as a new layer
Invert your selection and hit delete
Select none
Delete 10
Select 9
Select all, float, and defloat
Paste paper blksolid as a new layer
Invert your selection and hit delete
Select none
Delete 9
Repeat for rectangle 4
Select 8
Select all, float, and defloat
Paste paper drkpink2dolid as a new layer
Invert your selection and hit delete
Select none
Delete 8
Repeat for 4
Select 7
Select all, float, and defloat
Paste paper zebra paper as a new layer
Invert your selection and hit delete
Select none
Delete 7
Select 6
Select all, float, and defloat
Paste paper darkpink as a new layer
Invert your selection and hit delete
Select none
Delete 6
Select 5
Select all, float, and defloat
Paste paper solidltpink as a new layer
Invert your selection and hit delete
Select none
Delete 5
Repeat for 3 and 1
Select 2
Select all, float, and defloat
Paste paper stripes2 as a new layer
Invert your selection and hit delete
Select none
Delete 2
Add your tube of choice
Resize and position as desired
Add any elements you like
Resize and position
Add any dropshadows you like
Crop and resize as desired
Add your name and copyright
Resize as desired
Save!
Thanks for trying my tut!
Tuesday, June 5, 2012
Sugar Sugar

This tutorial was written by Kaci on June 5, 2012. Any resemblance to any other tutorials is purely coincidental! You may not copy/paste any part of my tuts elsewhere, but you may text link to them for challenges etc
Supplies Needed:
Template 389 by Minxy, you can find it HERE
Tube or image of choice, I am using a tube from the fabulous Elias Chatzoudis, you must have a license to use these tubes, which you can find out more HERE
Scrapkit of choice, I am using a great kit by TammyKat called Pink Sugar, which you can find it HERE
Let's Begin!
Open your template
Hit shift d and close the original
Resize all layers Smart Size to 675x547
Delete copyright info, all wording, dotted line, star1 and 2, and background
Go to Image, Canvas Size and change to 700x700 centered
Select raster 1
Select all, float, and defloat
Paste paper8 as a new layer
Invert your selection and hit delete
Select none
Delete raster 1
Select rectangle 1
Select all, float, and defloat
Paste paper as a new layer
Invert your8 selection and hit delete
Select none
Delete rectangle 1
Repeat for rectangle 2
Select rectangle centre
Select all, float, and defloat
Paste paper5 as a new layer
Invert your selection and hit delete
Select none
Delete rectangle centre
Add a new layer and send to the bottom
Select all and paste paper7 into your selection
Select none
Apply a mask of choice
Merge group
Add your tube of choice
Resize and position as desired
Add any elements you like
Resize and position
Add any dropshadows you like
Crop and resize as desired
Add your name and copyright
Resize as desired
Save!
Thanks for trying my tut!
Saturday, May 26, 2012
Sugar Rush

This tutorial was written by Kaci on May 26, 2012. Any resemblance to any other tutorials is purely coincidental! You may not copy/paste any part of my tuts elsewhere, but you may text link to them for challenges etc!
Supplies Needed:
Template 81 by Minxy, you can find it HERE
Tube or image of choice, I am using the fabulous artwork of VeryMany, you must have a license to use these tubes, which you can find out more HERE
Scrapkit of choice, I am using a great kit by TammyKat called Sugar Rush, which you can find it HERE
Let's Begin!
Open your template
Hit shift d and close the original
Resize all layers Smart Size to 675x587
Delete by missy and background
Go to Image, Canvas Size and change to 700x650
Select circle
Select all, float, and defloat
Paste paper twocolor1 as a new layer
Invert your selection and hit delete
Select none
Delete circle
Select rectangle3
Select all, float, and defloat
Paste pinkbluepaper as a new layer
Invert your selection and hit delete
Select none
Delete rectangle3
Repeat for rectangle1
Select rectangle2
Select all, float, and defloat
Paste heartpaper1 as a new layer
Invert your selection and hit delete
Select none
Delete rectangle2
Select small rectangles
Select all, float, and defloat
Paste bluepp as a new layer
Invert your selection and hit delete
Select none
Delete small rectangles
Add your tube of choice
Resize and position as desired
Add any elements you like
Resize and position
Add any dropshadows you like
Crop and resize as desired
Add your name and copyright
Resize as desired
Save!
Thanks for trying my tut!
Subscribe to:
Posts (Atom)